
How to Deinterlace Video
You might be wondering what’s the deal with interlacing, right? Well, it’s been a big part of how we’ve been recording and showing videos for a long time. It’s like a clever trick that saves space and makes things run more smoothly. But, there’s a catch – sometimes it can make your videos look a bit funky, especially on those fancy new TVs that are all the rage these days. So, let’s break it down.
In this article, we’re going to take a deep dive into what interlacing is all about and how deinterlacing video can swoop in and save the day, helping you achieve those buttery-smooth, high-quality videos you’ve been dreaming of and also helping you enhance the old video quality easily.
What is Interlacing and Why it Occurs
Interlacing is a method of encoding video signals where each frame is split into two fields: one containing the odd lines and the other containing the even lines. These fields are then alternately displayed, to reduce bandwidth and storage requirements while maintaining acceptable video quality. Interlacing was particularly useful in the early days of television broadcasting and video recording, as it allowed for lower bandwidth transmissions and smaller file sizes.
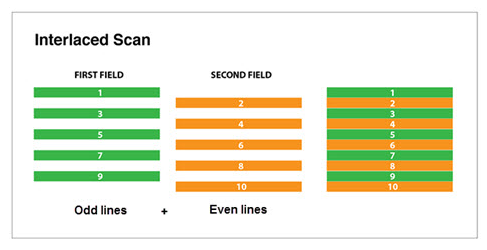
Interlaced Scan
Despite its benefits, interlacing can cause several visual artifacts that negatively impact video quality, particularly when viewed on progressive displays like computer monitors and modern TVs. Some common issues include:
- Jagged edges: Interlacing can cause diagonal lines and edges to appear jagged or saw-toothed.
- Flickering: Rapid movement or transitions can result in a flickering effect due to the alternating fields.
- Combing: When an interlaced video is paused, adjacent lines from different fields can create a “combing” effect, where the image appears to be vertically stretched and distorted.
What is Deinterlacing and Its Benefits
Deinterlacing is the process of converting an interlaced video signal into a progressive one. This is achieved by combining the odd and even fields into a single frame, effectively doubling the frame rate. Deinterlacing helps to minimize the visual artifacts associated with interlacing, resulting in a smoother, clearer, and more visually appealing video.
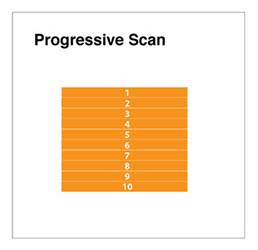
Progressive Scan
The benefits of deinterlaced video include:
- Improved video quality: Deinterlacing removes jagged edges, flickering, and combing effects, resulting in a more pleasing viewing experience.
- Better compatibility with modern displays: Progressive video is better suited for viewing on computer monitors, HD TVs, and other modern displays.
- Easier editing and post-production: Deinterlaced footage is easier to work with in video editing software, as it eliminates the need to switch between field rendering modes constantly.
How to Deinterlace Videos [Step-by-Step Guide]
Deinterlacing your videos is a straightforward process that can be accomplished using the most popular video editing software. Here’s how to deinterlace your footage in three of the most widely used programs:
Deinterlace Videos in Adobe Premiere Pro
Kickstart your video editing journey with Adobe Premiere Pro, a powerhouse for creative professionals.
Step 1. Import your interlaced footage into your project.
Step 2. Right-click on the clip in the timeline and select “Field Options.”
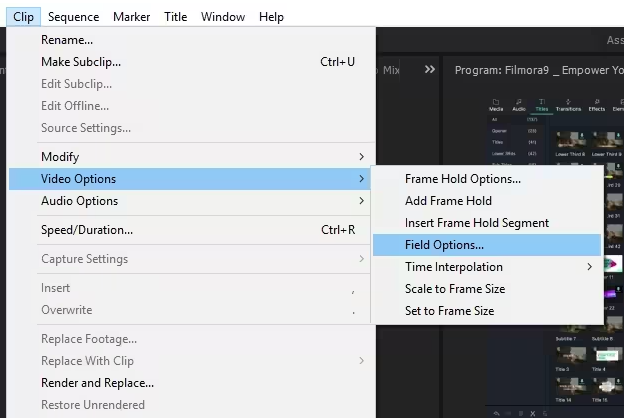
Click Field Options in Adobe Premiere Pro
Step 3. Choose the appropriate deinterlacing method based on your footage and desired output quality.

Adjust Field Options Settings
Step 4. Export the deinterlaced video using your preferred settings.
Deinterlace Videos in Final Cut Pro
Unlock the potential of Apple’s Final Cut Pro for advanced video editing. This section will guide you through the process of deinterlacing videos, and optimizing your footage for modern playback standards with ease and precision.
Step 1. Import your interlaced footage into your project.
Step 2. Select the clip in the timeline and navigate to the “Inspector” panel.
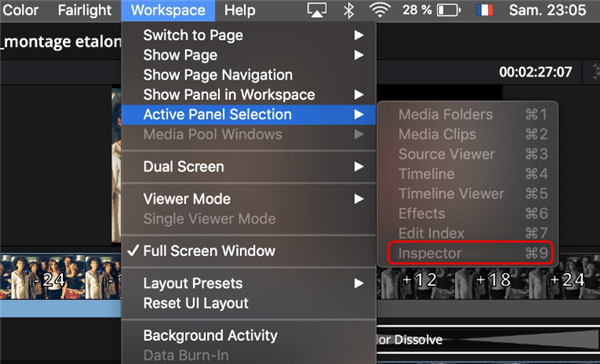
Active Inspector Option in Final Cut Pro
Step 3. In the “Video” tab, locate the “Field Dominance” dropdown menu and select “None.”
Step 4. Export the deinterlaced video using your preferred settings.
Deinterlace Videos in DaVinci Resolve
Master the art of video post-production with DaVinci Resolve, a suite renowned for its color grading prowess. Discover how to deinterlace your videos, enhancing the quality and ensuring your cinematic vision shines through.
Step 1. Import your interlaced footage into your project.
Step 2. Right-click on the clip in the timeline and select “Clip Attributes.” > In the “Video” tab, locate the “Field Dominance” dropdown menu and select “None.”
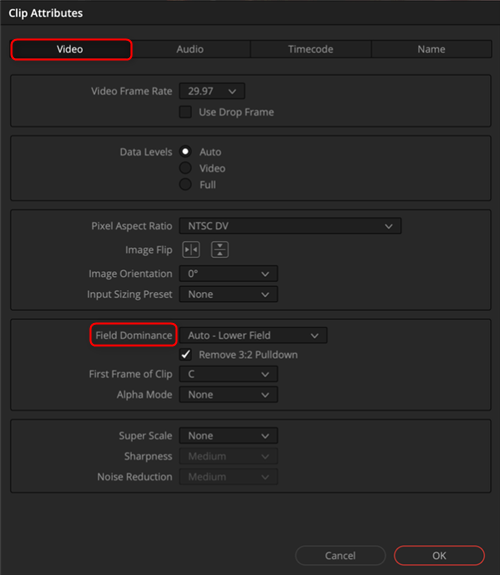
Clip Attributes Settings in DaVinci Resolve
Step 4. Export the deinterlaced video using your preferred settings.
Common Mistakes to Avoid During the Deinterlacing Process
To ensure the best results when deinterlacing your videos, avoid these common mistakes:
- Applying deinterlacing to progressive footage: Deinterlacing progressive video can introduce unnecessary artifacts and degrade quality.
- Using the wrong deinterlacing method: Different deinterlacing methods work better for different types of footage. For example, bob deinterlacing may work well for static shots, while adaptive or motion-compensated methods are better suited for footage with a lot of movement.
- Exporting in an interlaced format: After deinterlacing your video, make sure to export it in a progressive format to avoid reintroducing interlacing artifacts.
FAQs on Deinterlacing Video
Can I deinterlace my videos without losing quality?
While deinterlacing always involves some level of interpolation, using advanced methods like adaptive or motion-compensated deinterlacing can minimize quality loss and produce excellent results.
How long does it take to deinterlace a video?
The time required to deinterlace a video depends on several factors, including the length of the footage, the deinterlacing method used, and your computer’s processing power. In general, more advanced methods like motion-compensated deinterlacing will take longer than simpler methods like bob deinterlacing.
Do I need special software to deinterlace my videos?
Most popular video editing software, such as Adobe Premiere Pro, Final Cut Pro, and DaVinci Resolve, have built-in deinterlacing tools. However, there are also dedicated deinterlacing software options available, like FieldsKit and InterlaceRemover, which may offer additional features and customization options.
Summary and Conclusion
Interlacing has been a crucial technique in video recording and broadcasting, helping to reduce bandwidth and storage requirements. However, it can also lead to visual artifacts that degrade video quality, especially when viewed on modern, progressive displays. Deinterlacing is the process of converting an interlaced video signal into a progressive one, effectively removing these artifacts and resulting in a smoother, more visually appealing video.
By understanding the different deinterlacing methods and following best practices, you can successfully deinterlace your videos using popular video editing software like Adobe Premiere Pro, Final Cut Pro, and DaVinci Resolve. Remember to avoid common mistakes, such as applying deinterlacing to progressive footage or exporting in an interlaced format, to ensure the best possible results.
In conclusion, deinterlacing is an essential skill for anyone working with video content, whether you’re a professional editor or an enthusiast. By taking the time to deinterlace your videos properly, you’ll be able to deliver higher-quality content that looks great on any modern display.