How to Blur a Screen Recording?
Almost every computer and smartphone features a camera and some kind of recording software, so making videos has become a routine task. The recordings we make may be intended for business or fun, and they frequently include the content of the screen or a person’s surroundings.
It’s not rare to accidentally reveal things that were supposed to remain private while making a recording. This can cause a minor embarrassment, lead to a missed business opportunity, or in the worst cases expose the creator to serious security risks. Since it’s not always possible to avoid capturing details that are best left unseen, the only solution is to spot them before the video goes public and make sure they are not visible in the final version.

How to Blur a Screen Recording
It’s not very hard to protect your privacy, and once you understand how to blur a screen recording before sending or uploading it, you might start doing it automatically every time.
Why Do You Need to Blur a Screen Recording?
When you are recording the content of your screen with or without webcam feed, a lot of things can be captured without even noticing. This can include other applications that you might have open, sensitive information such as addresses, bank accounts, etc., or confidential details about the project you are currently working on. In either case, revealing such information might cause a potential problem and blurring it out preventively is a much safer option.
When deciding whether to blur some parts of a video recording, it’s necessary to assume it might be seen by people who were not the intended recipients. It’s better to err on the side of caution than to have personal or professional life compromised because of a simple omission. Blurring anything that could potentially cause a problem is a smart approach and it’s important to be consistent with it.
Any content creator should double check his videos for sensitive information and routinely blur them before anyone else has a chance to see to recording. That might require a bit of technical preparation and a basic understanding of video making software.
How to Blur a Screen Recording?
Blurring a part of your recording is a simple editing task that can be accomplished by an average user in a short time frame. Most screen recorders have a feature that allows user to blur or otherwise obscure a selected part of the screen, and this feature isn’t very hard to use. The exact procedure depends on what you want to hide and the software you are recording with, but in general it only takes a few clicks to accomplish the desired outcome. Here are some possibilities at your disposal.
Blurring Details on the Screen
This is a very common scenario that occurs whenever a screen recording is showing legal or financial documents containing private information, among other scenarios. The numbers need to be obscured to prevent any possibility of abuse, while items showing a person’s social, religious, or political attitudes might need to be blurred for privacy reasons. Fortunately, this can be done with a simple edit after the recording has been completed. Here is what to do:
Step 1. Install and open a screen recording app that includes a blur function (i.e. Screencastify or Movavi).
Step 2. Import your recording into the app (or create a new recording with it).
Step 3. Find Editing/Annotation tools and choose Blur effect.
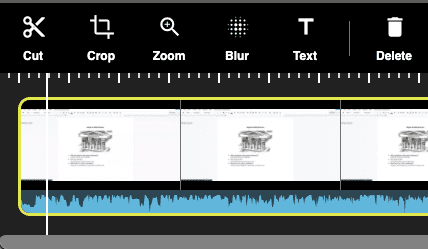
Choose Blur Effect
Step 4. Select in which parts of the timeline and which parts of the screen the blur should be applied.
Blurring the Background while using the Camera
Another common practice is to obscure the background while streaming live or recording via webcam. This eliminates the chance that someone will photobomb the stream or that a personal item might slip into the picture. As opposed to the previous type of edit, this kind of blurring must be set up before the recording starts. Gemoo Recorder can allow you to record a video with a virtual background. You can always be ready for your live recordings, from recording video conferences to virtual classrooms and live streaming, using virtual backdrops.
- Gemoo Recorder offers you a plethora of options to make your screen recordings stand out. Not only can you capture the content you want to share with your audience, but you can also safeguard your privacy by using the camera’s diverse filters and incorporating a range of virtual backgrounds.
- With the ability to blur, erase, or substitute your backdrop with photos or videos, you have complete control over the visual elements of your recording. You can even select your favorite images as your avatar and showcase your unique style while expressing yourself through your facial expressions.
So, whether you’re recording a tutorial, a vlog, or a presentation, Gemoo Recorder empowers you to create content that is both engaging and visually stunning.
Here is what you need to pay attention to if you want to obscure your background while broadcasting a live recording from your camera:
Step 1. Free download and Launch Gemoo Recorder on the computer and enter your account and password to log in to Gemoo Recorder. Or you can also sign in with your Google account directly.
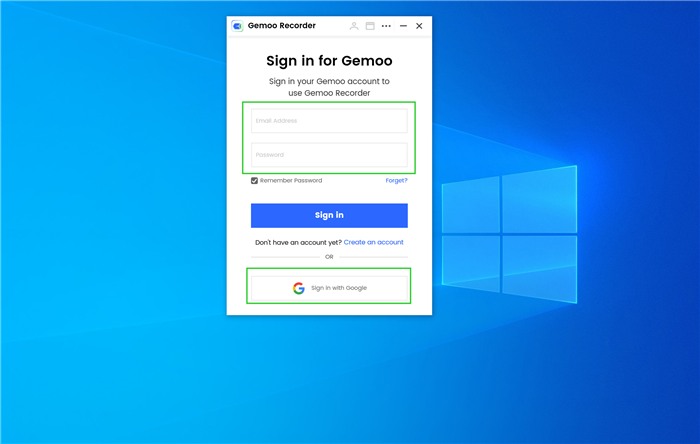
Sign in Gemoo
Step 2. Choose “Camera Only” and hit on the Start Recording button to start recording.
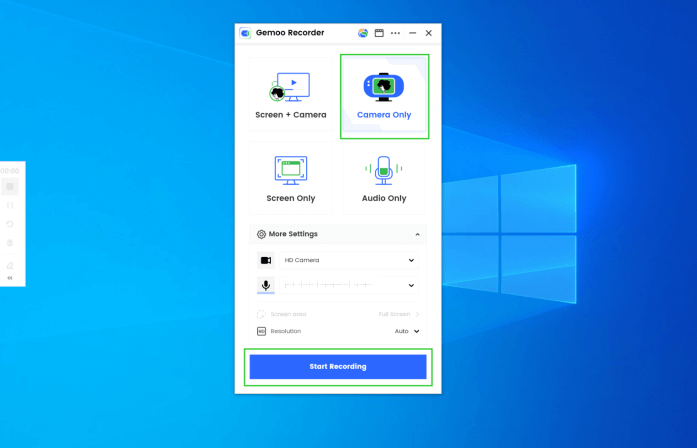
Select Camera Only Mode and Initiate Recording
Note: If you want to record the camera with a virtual background, please move your mouse to the camera avatar position, then, you will see the camera settings interface below.
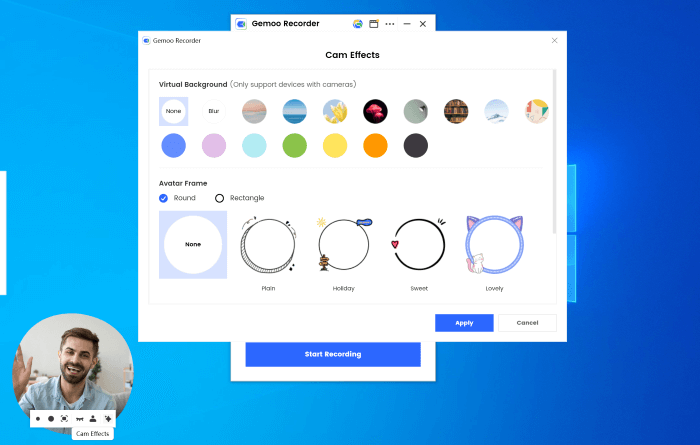
The Camera Effects Settings
Step 3. You can control your recording process by tapping on the control panel in the left sidebar: View recording consuming time, finish/pause/resume recording, restart recording, delete the recording and add annotations.

Record Video
Obscuring the Face
In some cases people want to create anonymous videos in which their faces wouldn’t be recognizable to the viewers. Blurring the face or using a filter that covers it are some of the techniques that can produce the desired effect. While this may sound more complicated than replacing a background, in practice it’s not very hard to obscure a face in a video recording using a simple editor.
The process of hiding a face in a video recording usually involves the following steps:
Step 1. Sign into an online editor with face-blurring capacity (i.e. YouTube Studio or Video Mosaic).
Step 2. Upload your video to the editor and go to the Settings menu.
Step 3. Choose the Face blur effect, and click on the Apply button.
Step 4. Select the part of the screen that needs to be covered with blur.
Step 5. Save the altered video locally to your computer or in the cloud.
Frequently Asked Questions about Blurring a Screen Recording
Is it acceptable to use partially blurred videos or blurred backgrounds in business communication?
Not only is this practice acceptable, but in many organizations there is a rule requiring all participants in a video communication to safeguard their sensitive information. The use of blurring is so widely accepted that employees are expected to know how to perform this task on their own from day one.
What is the fastest way to blur a screen recording without professional editing skills?
The best way to quickly blur out everything that needs to be hidden is to use a screen recorder that has this effect. That way you can blur the parts of recording that contain private or proprietary information as soon as capturing is over and before you save the file anywhere from where it can be accessed.
Is it possible to reverse the effects of blur and see the information that was obfuscated?
Once you apply blur on top of a recording, the pixels are permanently changed and it’s not possible to reverse this effect with any software application. The only way someone would be able to glean the obscured information is by obtaining a copy of the original recording made before blur was used.
Final Thoughts
There is no reason to fear that parts of your private life will leak into public if you share a lot of videos made on your home computer. Privacy can be protected by the strategic use of blurring in all of your recordings, effectively preventing the viewer to see the details that would reveal too much. Since in a technical sense it’s extremely simple to obscure any element of the video, content creators and users of video messaging applications can take their own precautions. The key is to spot every potentially compromising item and apply the blur effect before the video is shared with anyone – once it goes online it may be difficult to rectify the situation.

