Dive into Stardew Valley, a much-loved farming simulation game with magical instances worth game recording and capturing. Be it your farm’s first blossom, a significant moment with your favorite villager, or the hard-earned sight of an elusive, legendary fish, each player has instances they wish to immortalize. That’s when screenshots step in, acting as reminders of your in-game feats and unforgettable adventures.

Where Are Stardew Valley Screenshots
Understanding where these picture-perfect moments end up can be confusing, particularly if you’re new to the game or less tech-savvy. We will navigate you through Where Do Stardew Valley Screenshots Go, along with easy methods to capture them.
Table of Contents: hide
Where Do Stardew Valley Screenshots Go?
Once you understand the importance of screenshots in treasuring your Stardew Valley experiences, it’s time to uncover where these digital mementos lie.

Where Do Stardew Valley Screenshots Go
Stardew Valley Screenshots Go PC
Stardew Valley on a Windows PC seamlessly tucks your screenshots into a specific location. If you’ve been merrily snapping shots but aren’t sure where they end up, rest assured they find a secure spot on your PC. To be precise, your Stardew Valley screenshots take refuge in the following path: %appdata%\StardewValley\Saves.

Screenshots Location in PC
Here are a couple of simple strategies to locate these pictures:
Way 1. File Explorer Search
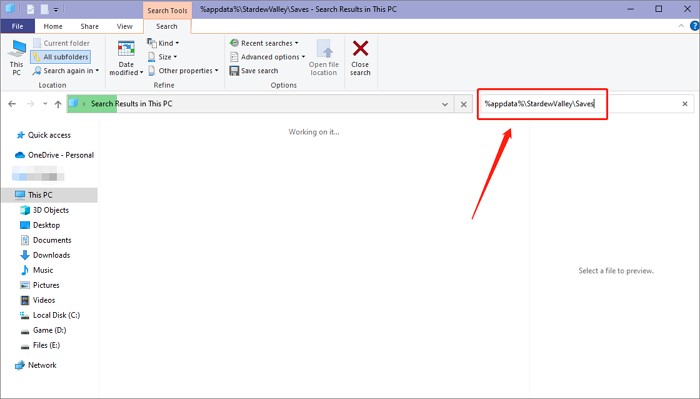
Launch Windows File Explorer. It is there on the taskbar at the bottom of the screen. You can find it by searching “File Explorer” in the Start Menu. There is an address bar at the top. Add %appdata%\StardewValley\Saves and hit enter. Your computer will instantly direct you to the folder containing your saved Stardew Valley shots.
File Explorer Search
Way 2. Use the Run Window
Press the Win+R buttons on your keyboard simultaneously. A window called ‘Run’ will emerge. Add the file path %appdata%\StardewValley\Saves into the text bar, press enter, or click ‘OK.’ You can open the folder with your Stardew Valley shots.

Run Window
Stardew Valley Screenshots Go Mac
Your Stardew Valley screenshots on a Mac are stored in this particular file path: ~/.config/StardewValley/Saves. Let’s decipher this:
The “~” symbol represents your home directory, and “.config” is a hidden directory hosting configuration files for numerous applications, including Stardew Valley. Inside the “.config” directory, you will spot the “StardewValley” folder. It has a folder titled “Saves.” This is the destination where your Stardew Valley screenshots reside. Here’s how you navigate this path:
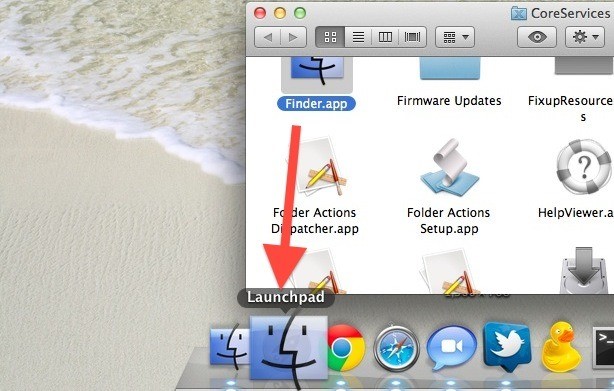
Step 1: Launch the Finder application, typically found on your Mac’s dock and identifiable by a blue and white face icon.
Launch the Finder App
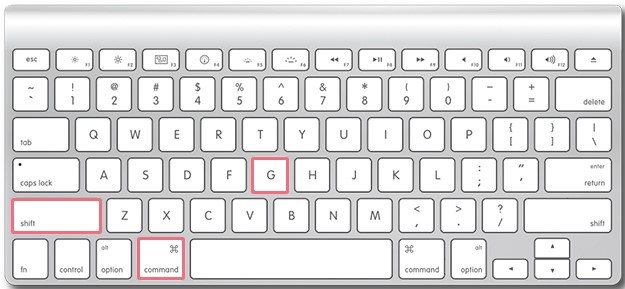
Step 2: Once the Finder window is activated, press the “Command+Shift+G” keys simultaneously. This will open a “Go to the folder” dialog box.
Press Command+Shift+G
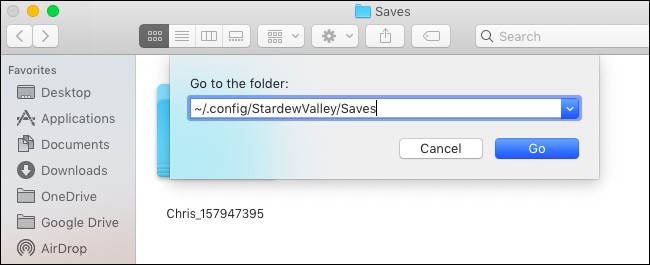
Step 3: In the dialog box, add the following path: ~/.config/StardewValley/Saves, and then tap the ‘Go’ button or press Enter.
Add Path
Step 4: You’ll spot the “Saves” folder, a treasure trove of your Stardew Valley shots.
These screenshots are saved in a PNG format, and each file bears a name corresponding to the precise in-game time the screenshot was snapped.
How to Take a Screenshot of a Stardew Valley Farm?
The key to a memorable screenshot is knowing how to take it first! In this next chapter of our guide, we’ll explore three simple yet effective ways to capture screenshots of your Stardew Valley farm.
Use Gemoo Snap
Gemoo Snap is not just another screenshot tool. It’s an all-in-one platform built with an intuitive interface and a wide range of features that cater to all your screenshot needs. From quickly snapping a shot of your Stardew Valley Farm to easily annotating a detailed guide of your farm layout, Gemoo Snap provides the tools to express your creative ideas vividly.
Its impressive features extend beyond capturing images, offering functionalities like text recognition (OCR), screenshot beautification, and an extensive library for saving and organizing screenshots. With Gemoo Snap, capturing your Stardew Valley moments is just the beginning of what you can do.
Snap an image instantly without interrupting your gameplay. Your shots are immediately saved to Gemoo, making your Stardew Valley memories easy to preserve. This feature lets you take a screenshot, annotate it with brush strokes, text, shapes, numbers, and even a mosaic effect, and then copy and paste your screenshots. With various annotation tools, you can tailor your image exactly as you want, even blurring or pixelating areas to hide sensitive information or mark steps with numbers.
Gemoo Snap’s Key Features
- Capture, recognize, and extract texts from screenshots via its OCR feature.
- Pin your screenshots to your screen, keeping them in view until you decide to unpin them.
- Capture images, add feedback and annotations, or share them via one link. The Feedback function allows you to number your images and comment underneath them, perfect for explaining your farm design strategies.
- Beautify your screenshots with solid colors and featured backgrounds and rotate your image. You can also annotate your screenshot for added clarity or emphasis.
- Your screenshots can be saved locally or uploaded to the cloud. You can view and re-edit them using Gemoo Local, and if they’re in the cloud, you can manage them through Gemoo Cloud.
Guide to Using Gemoo Snap
Step 1. You can launch and use Gemoo Snap PC once downloaded and installed Gemoo Snap. When launched, you must sign into your Gemoo account; newcomers should create one before signing in.
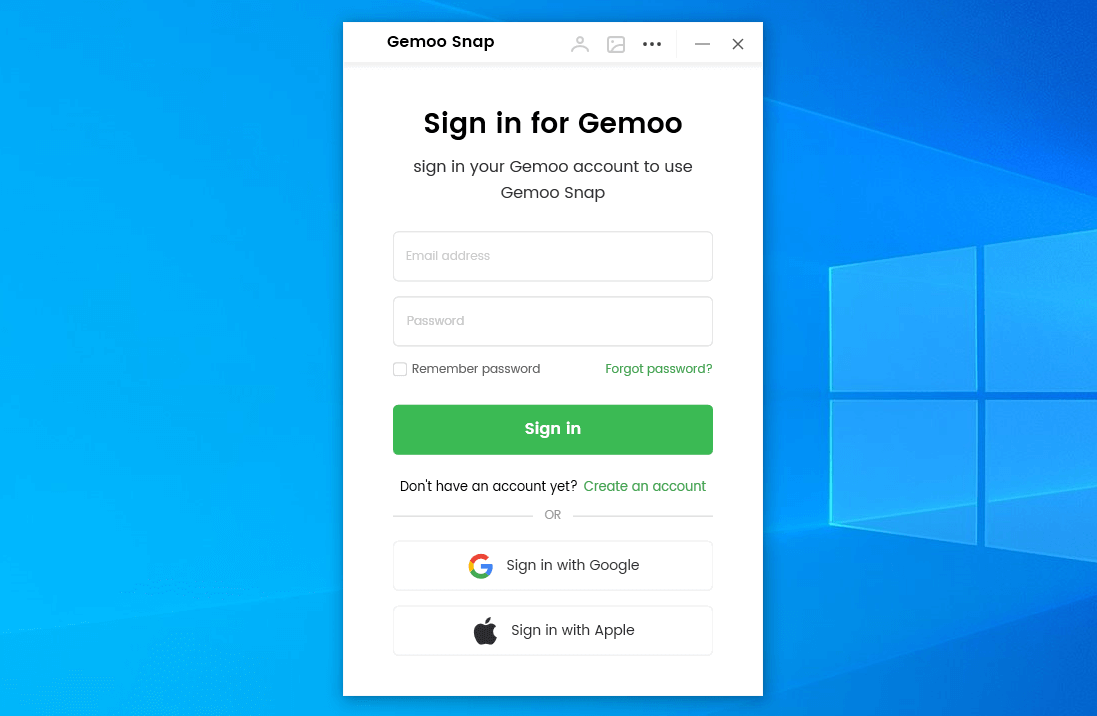
Sign in to Gemoo Snap
Step 2. Once signed in to Gemoo Snap, select the ‘Clipboard Screenshot’ function via its interface or use shortcut keys to activate this feature.
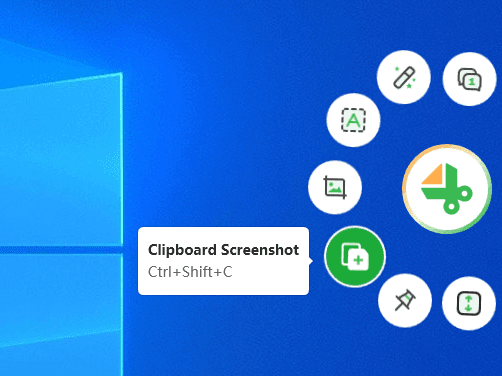
Select Clipboard Screenshot
Step 3. Drag your mouse over an area you wish to capture and release on your screen. Gemoo Snap will capture this area and even allow for taking pixel-perfect screenshots, capturing every detail you wish to highlight.
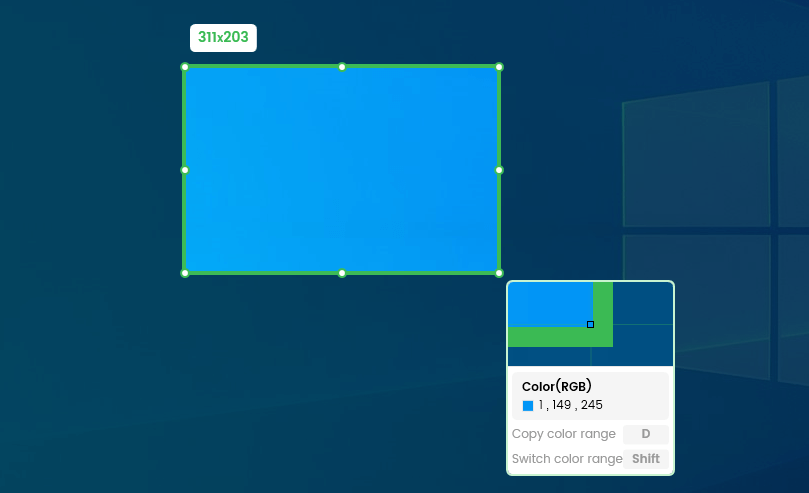
Frame the Screen
Step 4. Once captured, you’ll see a toolbar filled with annotation tools such as brush, text, line, shape, number, and mosaic. If necessary, you can undo any previous changes or cancel the screenshot capture altogether.
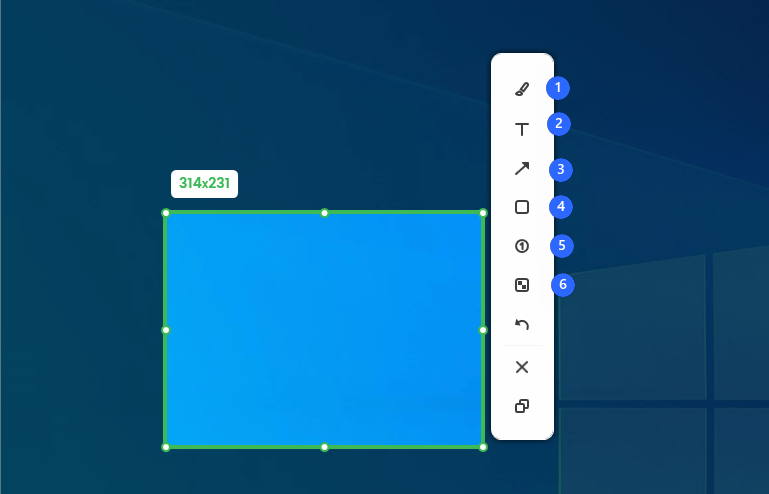
Annotate the Screenshot
Once your screenshot is annotated to your satisfaction, click the copy button to save it to your clipboard. Gemoo Snap will upload your screenshot, and if successful, it will show ‘Upload Successfully’ on your screen. Your screenshots can be viewed and managed in the Gemoo Snap Library. If the upload fails, you can retry by selecting ‘To be Uploaded’ and click ‘Upload’ to send them to Gemoo Cloud again.
Use Stardew Valley’s In-built Screenshot Tool
Stardew Valley stands out among other games by including an ingenious screenshot feature to allow for quick capture and replay of gameplay moments. This thoughtful addition enables you to remember those special memories whenever you wish!
Step 1: Press ESC on your keyboard or access the pause menu to pause gameplay and get that perfect photo. It ensures the game remains frozen, so you have all the time you need to take great shots.

Press ESC
Step 2: After pausing the game, click on the ‘Options’ tab – depicted by a controller symbol – which houses all game settings and screenshot functionality.
Step 3: Scroll to the bottom of your options page, where you will see a camera icon labeled ‘Screenshot.” This useful tool provides access to capturing those precious moments during gameplay.
Camera Icon
Step 4: Click on the camera icon. Just like that – you’ve captured a screenshot! It’s that simple. The image will immediately be saved to your screenshot library.
Use System Shortcuts
Whether you’re using a Windows PC or a Mac, your computer comes equipped with its own system shortcuts for screen capturing.
As a Windows user, the Print Screen (PrtSc) key is your best friend. Pressing it will swiftly take a screenshot of your entire screen, capturing every bit of the action on your farm. This screenshot will move directly to your clipboard. If you want to capture a specific window or portion of the game, press Alt + PrtSc. From there, it’s as simple as pasting the screenshot into your favorite image editing program, such as Paint, for any necessary adjustments or saving.

Windows System Screenshot Shortcut
Mac System Shortcut:
On a Mac, taking screenshots is extremely easy. Pressing Shift + Command + 3 will quickly take an image of your entire screen; for more targeted captures, press Shift + Command + 4 instead, and a crosshair will appear. Drag this across your display to select what area needs capturing.
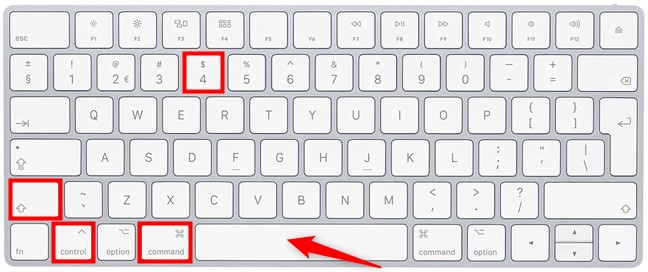
Mac System Screenshot Shortcut
Final Thoughts
Taking a screenshot of your Stardew Valley farm isn’t only a task—it’s an opportunity to encapsulate your achievements and the joy this game brings. Experiment with these three methods—Gemoo Snap, Stardew Valley screenshot feature, and system shortcuts—to find one that best meets your needs and share your experiences and insights via the comments section. Let us know if you found out the answer to Where Do Stardew Valley Screenshots Go. Your input could prove invaluable to our community, fostering learning and collaboration. Happy farming and happy capturing!