How to Reverse a Video on CapCut
Capturing a video with a smartphone is completely effortless, which allows content creators to collect snippets of useful material almost everywhere they go. Of course, raw footage can rarely be used without editing, which is why editing applications like CapCut that let users quickly prepare videos for social media are so popular lately.
CapCut is an editing tool designed for the average user, and most of its functionalities are quite accessible and logical. It’s a popular tool with online content creators, especially those who post their videos on TikTok. If you want to join the ranks of social media streamers and influencers, understanding how to use this tool is a must. This article will show you how to reverse a video on CapCut so that you can show the recorded activities in a fun and unexpected way.
Further Reading: How to Remove Text from a Video?
Why Reversing a Video in CapCut is Important?

Capcut Interface
Since we tend to capture videos that show events from start to finish, at first the idea of reversing a video may sound strange and counterproductive. However, on second thought there are many reasons to master this editing technique and use it selectively to achieve specific goals. Showing an event backward can often add an extra element to your narration, provide a contrast to the original shot, or simply add a lighthearted effect to your video. Here are some contexts in which reversing a video clip could be useful when you are making a social media post with CapCut.
- You want to show the same event multiple times, going back and forth through it
- The footage shows ambiguous subjects that may look good in reverse (i.e. waves, wind, etc.)
- The central event in the video happens suddenly, and reversing helps to explain what happened
- The video shows an irreversible process (i.e. sand castle being destroyed, egg shells being smashed) and a reverse view reveals its mechanics
- There is a funny scene in the video that looks even more hilarious when viewed backwards
- The video is too dull and reversing one part of it can be a way to engage the viewer
- The reverse view looks weird and is worth including for shock value alone
How to Reverse Video in CapCut on Mobile Phone?
Since many content creators like to put together TikTok videos on their smartphones, CapCut app is frequently used on a mobile device. All of its functions are available in this version of the software, including the ability to change the direction of the video playback. You can easily reverse videos of any length in the mobile version of CapCut, and the procedure to follow is rather straightforward. Here are the actions you need to take in order to alter the video flow on your phone.
Step 1 – Install CapCut on a mobile device on which you have the video stored and give it all the necessary permissions
Step 2 – Tap on the New Project function, then proceed to import your video into the project
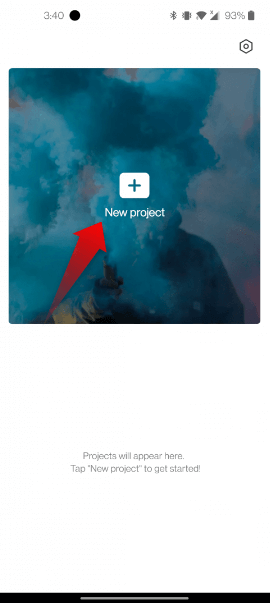
Tap on the New Project Function
Step 3 – After the video opens and you enter the editing mode, scroll through the editing options in the toolbar at the bottom of the screen
Step 4 – Find the Reverse option in the toolbar and tap on it, then wait for a few moments for the video to be reversed before saving it
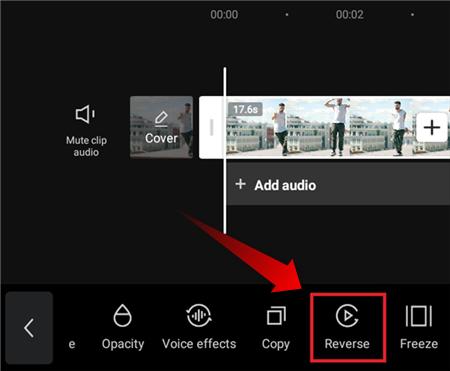
Click on the Reverse Option
How to Reverse Video in CapCut on a PC?
It’s also possible to use CapCut on a Windows-based machine or a Mac computer or access this tool from a cloud. In fact, you can get better results when you are using the PC version of this editing app and working on a larger screen. Rather than installing a desktop version, many users choose web-based access and edit their videos online. The procedure for this involves the following steps.
Step 1 – Visit the official website of CapCut and log in with valid credentials
Step 2 – Click on Edit Online, then select the pre-set that will apply to your video
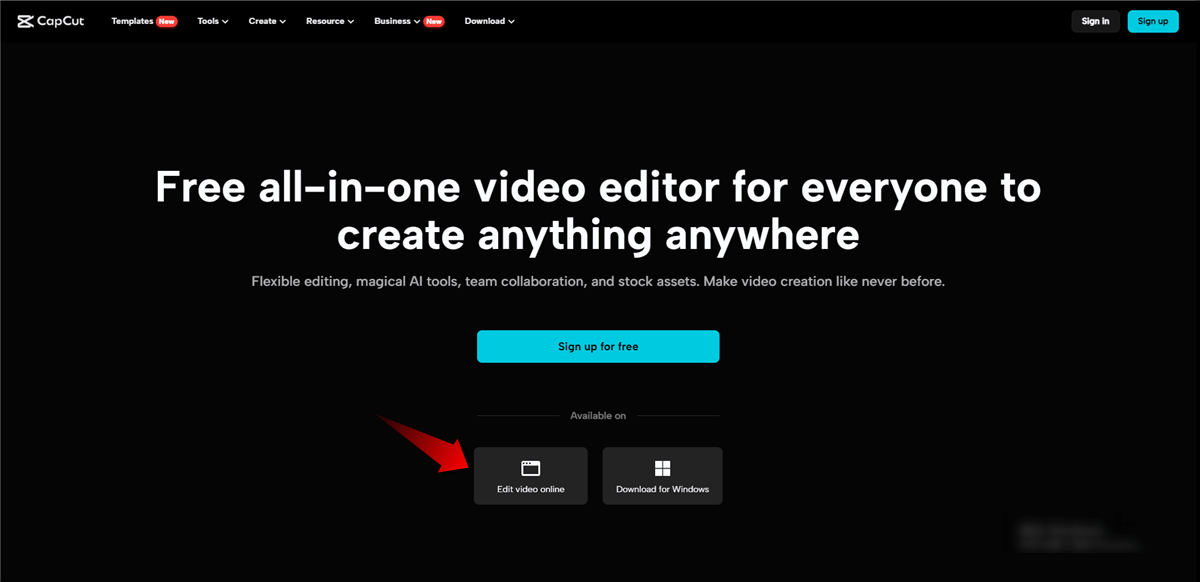
Click on Edit Online
Step 3 – Click on the Upload button and select the video from your computer or a cloud storage location
Step 4 – After the video opens in the timeline, find the Reverse button and click on it
Step 5 – Wait for the reverse procedure to complete, then use the Export button to save the new version to your PC
Why Can’t I Reverse a Video on CapCut?
In rare cases, the Reverse function may fail to execute properly. There are a couple of reasons why this may happen, including the lack of available memory on your device, bugs in the CapCut app, system issues with your OS, etc. While it may not always be possible to ascertain why CapCut failed to reverse the video as instructed, there are a few things you could try to fix the issue. Restarting the device, clearing out your cache, or reinstalling CapCut are some of the measures you can try to get this function back to normal functioning.
What Happens to Audio When I Reverse a Video in CapCut?
One important aspect of reversing a video that we haven’t discussed is how the changes affect the audio stream. By default, CapCut will also reverse the audio when you use this function, so it may result in any spoken content becoming completely unintelligible and ambient sounds being backwards. If you want to avoid this, you should separate the audio channel from the video before you reverse it, and then put it back together.
In case you want to reverse audio only, this function is not directly supported by CapCut. However, there is a workaround you could use – by putting the audio on top of a blank screen video you get the possibility to use the video reversal function as described above. Once you do that, simply discard the placeholder video and use the reversed audio as you originally intended.
FAQs about Reversing a Video in CapCut
Is it possible to cancel the effects of reversing the video and get the original version back?
CapCut lets you cancel any changes that you haven’t saved, so if you don’t like the outcome you can just annul your action. Even if you already saved a reversed version and deleted the original one, going through another reversal in the opposite direction will return the video to its original state.
Can I reverse only a selected part of the video in CapCut?
The Reverse function only works with the entire video contained in the selected file, and you can’t select only one part. In case you need to reverse only a limited portion, you have to cut the video and save that portion as a separate file, then just go through the standard procedure with that file.
How long does it take to reverse a typical video clip for social media?
Since videos of this type are usually not too long or large, the process typically lasts only a few seconds. However, the speed may not be the same on every device and for videos in all screen resolutions, so even if you have to wait for a couple of minutes you shouldn’t be worried about the outcome.
Conclusion
Adding a personal touch to your videos in post-production can help to win the hearts and minds of your audience. One way to do that is to display a reversed version of something you recorded and amplify the effects by adding appropriate graphics and sounds. While this is a very simple editing technique, it can often make a strong impression on the viewer and make the video more memorable. On the other hand, reversed video may be too goofy to include in serious business presentations, and should be used judiciously even in TikTok videos. What’s your experience with reversing videos, and what tool do you use to achieve this effect? Please share your views in the comments.