The Easiest Way to Record DVD to Your Computer (Windows or Mac)

External media carriers have been crucially important before the rise of cloud storage and huge flash drives. When it was first launched, the DVD format was a big step forward as it allowed far more information to be stored on the disk than on the standard CD while being the same size. It was widely used to release movies and music, often in formats that allow the content to be played on a simple reproduction device (DVD player) rather than a full-featured computer.
Also read: How to Screen Record on Surface Pro >
However, the dominance of this medium didn’t last very long, as it was soon overshadowed by better technologies that followed. Today, DVDs are still in use but are being slowly phased out as new multimedia is typically sold through streaming services. For older material though, ripping a DVD might be the only viable way to get the desired media to your computer, so it’s good to know the correct procedures and be prepared to use this old-school device.
It doesn’t take very long to record a DVD on your computer if you know what you are doing, but you could also waste a lot of time if you are not well practiced with this kind of task. Let’s go through the basic procedures for copying a DVD to a computer for Windows-based PCs and those that run MacOS as well as the best free video recording software.
Table of Contents: hide
Part 1- How to Record DVD on a Windows-based PC
Part 2 – How to Copy DVD to Mac
Part 1- How to Record DVD on a Windows-based PC
If you are a PC user, you won’t have too much trouble screen recording from a DVD to your computer. However, you need to use the most convenient tool so you can save time and effort and guarantee a positive outcome. Probably the quickest way to transfer a DVD to a Windows computer is with VLC, a practical and multifunctional application that might already be installed on your machine. This software can recognize the data on the disc and convert it into a format that you can play from the computer, effectively allowing you to rip most DVDs.
While VLC gives you only limited options for controlling the quality and consequently the size of the transferred file, the recording procedure is very straightforward. Here is what you need to do if you want to send data from a DVD to your computer using VLC:
Step 1: – Insert the disc into the DVD drive on your computer and run VLC on it
Step 2: Open the Media menu, then choose the Convert/Save option
Step 3: Select the Disc tab from the Open Media window, and choose the DVD option
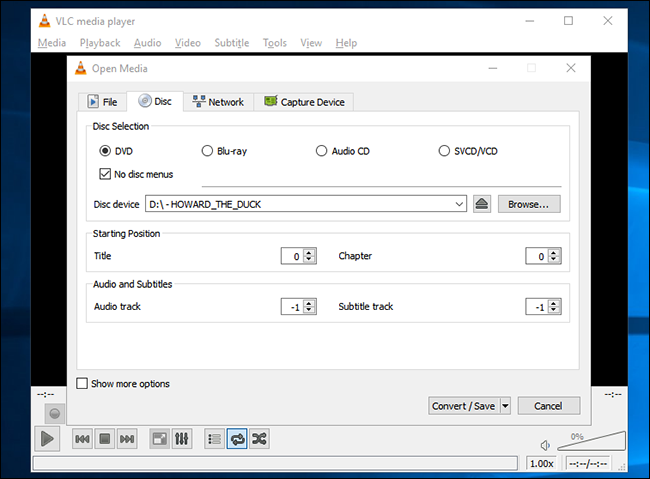
Choose the DVD Option
Step 4: Ensure that the active path is correct in the Disc device field
Step 5: Click on the Convert/Save button at the bottom of the screen
Step 6: Select the destination path in the Convert window and adjust other settings
Step 7: Click on the Start button to copy the content of the disc to the chosen destination on your PC
As we already mentioned, this method doesn’t allow for the compression of recorded data or changes in video quality. VLC also has a graphic interface that’s a bit outdated, so it might take a few tries before you become comfortable with the DVD-ripping procedure. This is why advanced users might want to consider an alternative DVD recording software that includes additional features.
Part 2 – How to Copy DVD to Mac
If you own a Mac notebook that has a DVD drive (or can be connected to an external one), there’s no need to worry whether it’s possible to copy information from a disc to your computer. Just like on a PC, this will require you to use the appropriate software for file conversion, allowing you to save the data in a format that you can open on the computer. Fortunately, there is a tool for this task built into the MacOS operative system, so you most likely won’t have to download any external software.
The app you need to copy DVD to Mac is named Disc Utility, and it’s extremely simple to use regardless of your experience level. Here is what you need to do to safely get the movie or any other content from a DVD to your hard disc using the built-in feature in MacOS:
Step 1: After you insert the DVD into the drive, activate the Disc Utility feature. If you can’t find it among the applications, you can type its name into search and the icon will show up
Step 2: The app will instantly recognize the currently used DVD under the External tab, and you need to click on its name to access its content and initiate the recording process
Step 3: Click on the File option in the header and choose New Image from the drop-down menu, then click on the Image from [DVD name] item
Step 4: Select a custom name and format for the image created from DVD, as well as the location on your computer where it will be saved
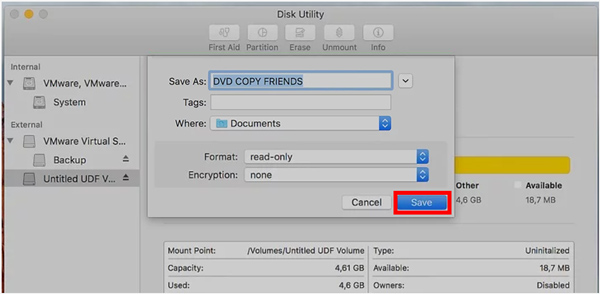
Select A Custom Name
Step 5: After choosing the preferred options for all the relevant settings, click on the Save button. This will create a file with .CDR extension at the designated location on your Mac
While this approach is very simple and convenient, it might not work with every DVD title. In case the content of the disc is protected against duplication, it might be necessary to use another tool that’s not a part of MacOS in order to get around the protection.
Part 3 –Record DVD via Gemoo Recorder
Gemoo Recorder is the most suitable free third-party software for recording DVDs besides the built-in DVD recording tools of Windows and Mac as above. As long as you select the appropriate video recording software, recording a DVD is simple. Gemoo Recorder, one of the most well-liked screen recording applications for 2023, is deserving of your attention. You can use it to capture what is happening on your screen and later play it back to review it. After downloading and installing Gemoo Recorder for free, you may view more screen recording features below.
Step 1: Free install Gemoo Recorder on your computer > Choose the “Screen Only” feature on the welcome page > Tap on the Start Recording button to get started.
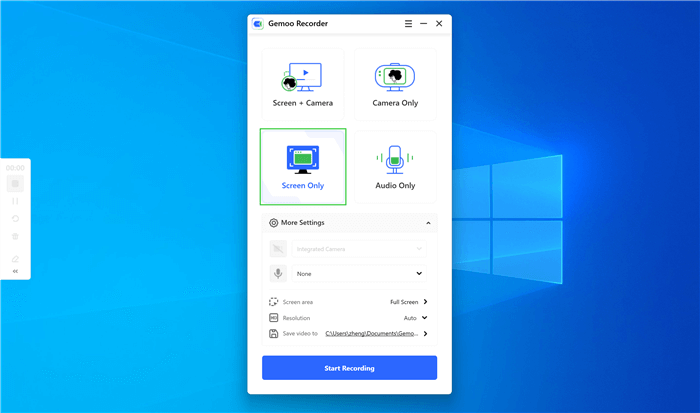
Select Screen Only Mode and Initiate Recording
Step 2: After three seconds, the screen recording will begin. You can choose from the options in the left sidebar to add annotations, animations, or other effects to the recording DVD as it is being made.
Step 3: Tap on the red Stop button when you want to stop the screen recording, after which you can view your recording video on your computer.
Because the DVD recording software that comes with Windows or Mac has its own limitations, so if you want to record DVDs with unlimited time and no watermark, then Gemoo Recorder is your best choice. Free download and try it.
Part 4 – Frequently Asked Questions about DVD Recording
1. Can I rip a DVD to a computer using Windows Media Player?
Windows Media Player is another well-known app that has the capacity to transfer information from a DVD to your computer while maintaining its accessibility. In addition to ripping DVDs, this application supports transfers in the opposite direction and allows users to burn data onto blank or rewritable DVDs.
2. How to record a DVD to a flash card?
Transferring the content of a DVD to a flash drive is done in a similar way to ripping it to a computer. The only difference is that a flash card needs to be selected as the destination instead of a hard disc. Of course, the flash card has to be large enough to host the files and concurrently inserted into the same computer as the DVD.
3. Can I record a DVD to another DVD?
Yes, this is possible to do. The exact procedure for copying DVDs depends on whether you have two DVD drives on your computer. Even if you have only one, you will still be able to perform this task by transferring the file to a computer first and then switching the DVDs in the drive before initiating the burning process.
Conclusions
Even if you don’t use DVDs very frequently, it won’t be difficult to learn how to record the media stored on them directly to your computer. Simple and reliable tools for this task are available for both Windows and MacOS, offering a free and fast way to make the transfer. In some cases, movies officially released on DVDs may not be possible to transfer with standard tools like VLC and Disc Utility, but even in this case, there is a good solution at hand. You will just have to find a better third-party DVD-ripping software and use it to bypass the software protection and convert the media file into a computer-friendly format.