How to install and Run Stable Diffusion on Mac?

In the exciting era of AI image generation, remarkable advancements have been made, allowing us to witness astonishingly realistic creations brought to life from mere text descriptions. Among the cutting-edge tools revolutionizing this domain is “Stable Diffusion,” an exceptional text-to-image deep learning model developed by Stability AI. Since its unveiling in August 2022, this remarkable AI-powered solution has captivated imaginations by transforming written words into striking visual masterpieces.
The concept of text-to-image generation has garnered substantial attention, and Stable Diffusion emerges as a leading contender in this rapidly evolving field. Unlike traditional image generation methods, Stable Diffusion employs the power of deep learning to produce high-quality images that can easily rival the realism achieved by renowned models like DALL-E 2 and Midjourney.
What sets Stable Diffusion apart is its ability to create stunning visuals and its accessibility as a free and open-source machine learning model, democratizing AI-generated imagery for a broader audience. In this article, we will guide you through directly utilizing Stable Diffusion’s text-to-image capabilities on your Mac system. So, let’s begin to learn how to install stable diffusion Mac!
Also read: How to Fix Stable Diffusion Errors? >
Table of Contents: hide
System Requirements to Run Stable Diffusion on Mac
System Requirements to Run Stable Diffusion on Mac
Embarking on the creative journey of text-to-image generation with Stable Diffusion on your Mac requires ensuring that your system meets specific prerequisites. Before diving into the realm of AI-generated visual wonders, let’s explore the essential system requirements to run Stable Diffusion seamlessly on your Mac.
- Operating system: macOS 12.5.1 or a later version.
- Processor: Your Mac should have an Apple Silicon chip, M1 or M2, or an Intel-based Mac.
- RAM: A minimum of 8GB or ideally 16GB of RAM to ensure optimal performance.
- Graphics: For seamless execution, a dedicated graphics card compatible with Metal API is recommended.
By meeting these essential system requirements, you can delve into the captivating world of text-to-image generation with Stable Diffusion, exploring the endless possibilities of AI-driven artistry on your Mac.
How to Install and Run Stable Diffusion on Mac?
You will discover Stable Diffusion to be a user-friendly and dependable piece of software if you are a Mac user wishing to use its advantages. This application provides thorough insights into material behaviour due to its capacity to mimic complex diffusion occurrences. Stable Diffusion’s installation and operation on your Mac will offer up a world of opportunities in the field of material science and open the door for ground-breaking developments in numerous industries.
Whether you prefer the convenience of an online version or the autonomy of a standalone desktop application, Stable Diffusion caters to both preferences. Users can revel in the fascinating process of witnessing textual ideas metamorphose into striking visual realities, all at the tip of their fingers. The flexibility to operate the model offline makes it even more convenient for Mac users seeking a seamless and efficient text-to-image generation experience. Below are the steps to install and run Stable Diffusion on Mac:
Step 1: Download the DiffusionBee App for macOS
Access the DiffusionBee website and find the option to download the macOS version of their app. Click on the “Download for macOS” button to initiate the app download process and enjoy the benefits of DiffusionBee on your Mac device.
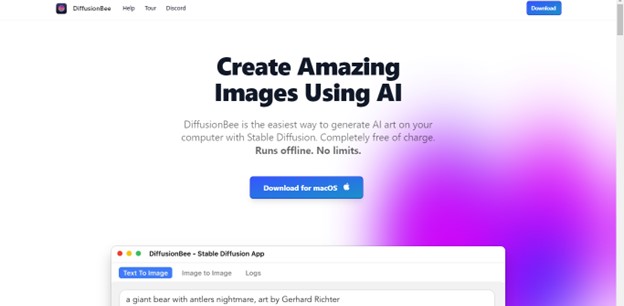
Access DiffusionBee
Step 2: Installing and Launching the DiffusionBee App
After completing the download, proceed with the installation of the DiffusionBee app on your macOS device. Once installed, open the app to start experiencing the features and functionalities of DiffusionBee. You can enjoy a seamless user experience on your Mac.
Step 3: Additional Model Downloads for First-Time Users
For first-time users of the DiffusionBee app, expect additional model downloads, which might take time based on your internet connection. If the download stalls midway, quit the app and reopen it to resume the downloading process seamlessly.
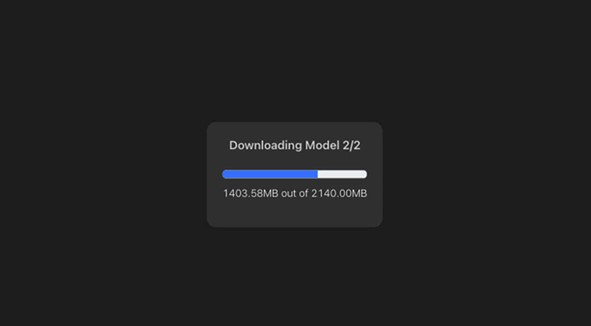
Additional Model Downloads
Step 4: Getting Started with Text To Image
After all the downloads have finished, you are ready to utilize the application. Begin by ensuring that you are on the Text To Image tab, proceed to the text field labelled “Enter your prompt here,” and commence inputting the descriptions for the images, concluding with any additional attributes you find suitable. Once this process is completed, you can use the app as intended.
Step 5: Generating Images with DiffusionBee
Click on “Generate” once you are content with your prompt. The DiffusionBee app will create an image according to your description/prompt. Please be patient, as this process might take some time.
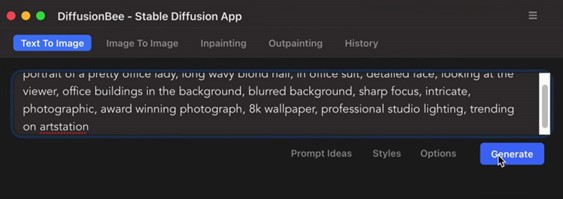
Click Generate
Step 6: Save, Download, or Upscale for Higher Resolution
After the image is generated, you have the option to Save/Download it or opt for upscaling to obtain a higher-resolution version of the image.
Additional Tips
Here are some extra tips to follow:
- To unlock a wider array of image choices, click the “Options” button and customize the “Number of images” to suit your preferences.
- Don’t hesitate to delve into other settings within the Options menu to optimize image quality.
- For optimal outcomes, consider upscaling the image before downloading.
- Using clear and concise language in your prompts will yield better results when interacting with the AI model.
- Keep the focus on the subject, and provide a brief description to foster effective communication with the AI.
- Embrace the opportunity to experiment and explore the multitude of possibilities available. You must discover its full potential while generating unique images that completely match with your ideas.
Final Thought
In conclusion, the installation and execution of Stable Diffusion on your Mac is a breeze, offering a seamless and gratifying experience for all users. You can effortlessly install stable diffusion Mac and unleash a world of creative possibilities by accessing the official Stable Diffusion website. With its user-friendly interface and myriad options, Stable Diffusion empowers you to create high-quality images easily.
The straightforward installation process ensures that even those new to image editing can quickly get started. Once installed, the software seamlessly integrates into your Mac’s Applications folder, ready to be launched at your convenience. Bid farewell to complex installations and welcome a hassle-free approach to image editing. Furthermore, share your experiences with us in the comments section below!