How to Change Aspect Ratio in Premiere Pro?

The aspect ratio of your video clip is quite important when it comes to determining how the final product will seem. It affects how your video is shown on various displays and platforms since the aspect ratio establishes the width and height proportions of your video frame. Want your videos to be optimized for different social media or content platforms? The first thing you should be aware of as an editor is how to adjust the aspect ratios to fit the screen or meet the requirements of that platform.
A new series may be made with the specified aspect ratio or the Auto Reframe series function can convert an existing sequence to the desired aspect ratio. Cropping and resizing video clips by hand to a different aspect ratio is also possible. Detailed explanations of each technique and helpful hints will be provided. Here we’ll go through some of the many options available in Premiere Pro for adjusting the aspect ratio.
Table of Contents: hide
What Is Aspect Ratio in Premiere Pro?
What Is the Default Aspect Ratio in Premiere Pro?
What Is Aspect Ratio in Premiere Pro?
The aspect ratio of a video is the ratio between its horizontal and vertical dimensions and is a crucial topic in video recording and video editing. It shapes the video’s visual composition and its appearance on different displays. The aspect ratio is very important in Premiere Pro because it influences how the viewers see your films.
Aspect ratios, such as 16:9 and 4:3, are a ratio of two integers, the first of which stands for the width and the second for the height. The visual impacts and emotions evoked by various aspect ratios are diverse. Widescreen aspect ratios, such as 16:9, are often employed in film because they provide a more engaging viewing experience. However, a squarer aspect ratio, such as 1:1, is popular on social media platforms because of the full and personal viewing experience it may provide.
To effectively portray their work visually, video editors must have a firm grasp of the idea of aspect ratio. Editors may prevent video distortion or cropping using the right aspect ratio for a project. This is especially important when sharing finished work across several platforms and devices. In the next section, we’ll go into Premiere Pro’s preset aspect ratios and what they mean for your video editing processes.
Further Reading: How to Convert Horizontal Video to Vertical >
What Is the Default Aspect Ratio in Premiere Pro?
Premiere Pro’s starting point for video editing projects is a collection of basic aspect ratio options. If you want your films to look well across platforms and devices, you need to master Premiere Pro’s default aspect ratio settings. These preset ensure that material will display properly on a variety of devices and operating systems since they are based on aspect ratios that are often utilized across media genres.
The industry standard for high-definition (HD) video, Premiere Pro frequently employs a widescreen (16:9) aspect ratio.
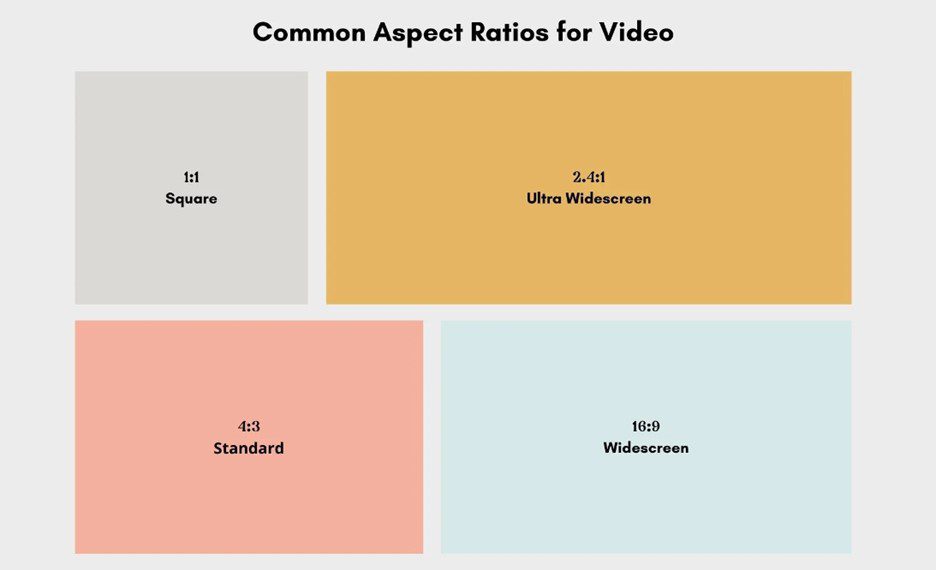
Common Aspects Ratios
Broadcasters, streaming services, and video-sharing websites often use this aspect ratio. It offers a gorgeous widescreen presentation that works with most of today’s screens, from desktop PCs to laptops to tablets and smartphones. Premiere Pro’s sequence settings are already calibrated to the correct aspect ratio so that you can edit your movies without delay.
It’s worth noting, however, that Premiere Pro’s default aspect ratio may be changed to better suit individual projects. Aspect ratios such as 4:3 (standard definition) for older devices and 1:1 (square) for social media sites like Instagram may need to be chosen depending on the desired platform or creative concept. If you want your films to look their best for your intended audience on any platform they could be viewed on, you need to know how to adjust Premiere Pro’s default aspect ratio.
Further Reading: How to Remove Watermark from Video Premiere Pro >
What Aspect Ratio Is Best for Premiere Pro?
Several considerations, including the target platform, content kind, and audience preferences, should be made when deciding on the optimal aspect ratio for Premiere Pro productions. Let’s look at the various aspect ratios and discuss which ones work best with Premiere Pro.
🚩 16:9 (Widescreen)
The 16:9 aspect ratio is the standard for video production. This aspect ratio provides a visually satisfying and engaging experience. It is a good choice for internet platforms, broadcasting, and Modern display devices that widely support it and give you that cinematic widescreen feel.
🚩 4:3 (Standard)
The 4:3 aspect ratio, the standard definition (SD) format, is a common design for televisions of a bygone era. While it’s less typical to utilize this method now, there are still situations when it might be useful.
🚩 1:1 (Square)
The square (1:1) aspect ratio is popular on social networking sites like Instagram, where videos are shown in a grid. This aspect ratio works well for drawing in viewers on mobile feeds and maintaining a sense of harmony in the overall design. Products, portraits, and other material that benefits from a focused emphasis are especially well-suited to this format.
🚩 9:16 (Vertical)
The 9:16 aspect ratio is widely utilized for mobile viewing, notably on services like Instagram Stories and TikTok, and is sometimes referred to as vertical or portrait orientation. This aspect ratio is best for mobile displays, preventing users from having to rotate their devices to enjoy full-screen video.
There are several elements to consider when deciding on the optimum aspect ratio for your Premiere Pro production. A larger aspect ratio, such as 2.35:1, may provide a cinematic effect, whereas a vertical or square ratio may be more suited to mobile viewing or social media.
Ensuring your films are optimized for the platforms and devices you plan to share them on begins with choosing the proper aspect ratio, which improves the watching experience for everyone. Aesthetically beautiful videos that convey your message clearly and keep your audience interested may be produced by selecting the correct aspect ratio. Try several aspect ratios in Premiere Pro until you discover the one that works best for your project.
Steps to Change Aspect Ratio in Premiere Pro
Changing the aspect ratio in Premiere Pro includes modifying the sequence parameters to fit your desired aspect ratio. You may use two basic techniques to alter the aspect ratio in Premiere Pro: establishing a new sequence with the desired aspect ratio or adjusting the current sequence parameters. Let’s study both strategies in depth.
Method 1: Creating a New Sequence
Step 1: Open Premiere Pro and start a new project or open an existing one.
Step 2: Select “New” > “Sequence” from the “File” menu.
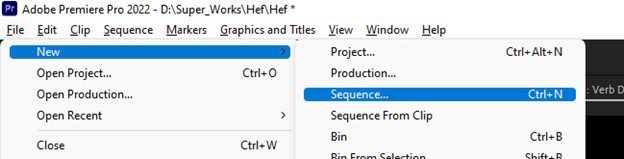
Select Sequence
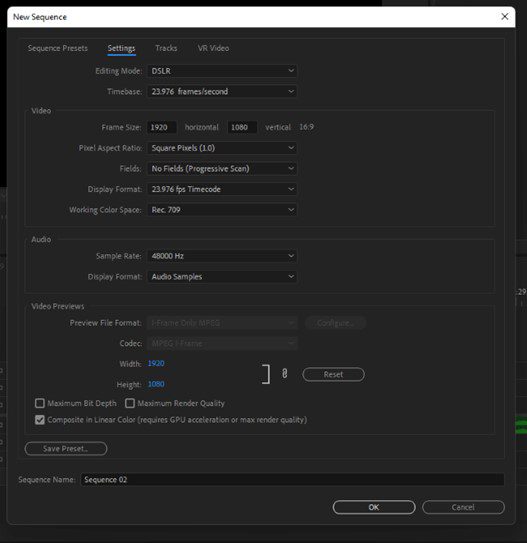
Step 3: In the New Sequence dialogue box, name your sequence and choose its frame size according to the aspect ratio you wish to achieve.
Step 4: customize the sequence to your liking by adjusting the frame rate, audio, and other options.
Step 5: Click “OK” to build the new sequence with the selected aspect ratio. Your new sequence has the proper aspect ratio, so you can start editing your films.
Build New Sequence
Method 2: Changing the Existing Sequence Settings
Step 1: Open Premiere Pro and open the project containing the sequence you wish to change.
Step 2: Find the sequence you wish to adjust the aspect ratio for in the Project panel.
Step 3: Right-click on the sequence and pick “Sequence Settings” from the context menu.
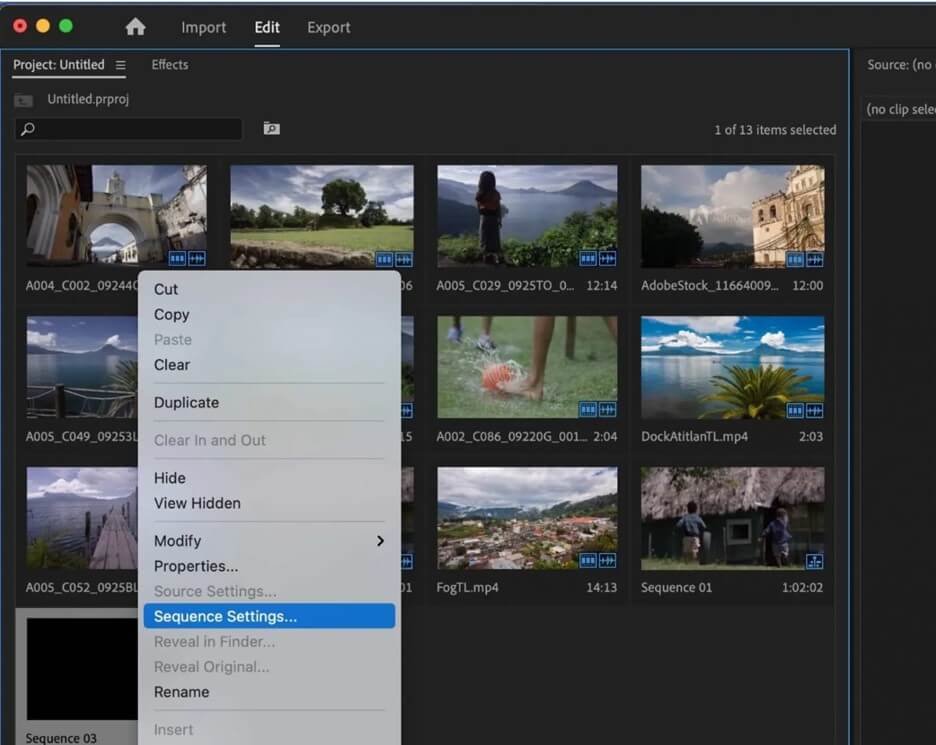
Open Sequence Settings
Step 4: In the Sequence Settings dialog box, set the frame size to match the desired aspect ratio. You may manually input the appropriate width and height values or pick a preset that matches the desired aspect ratio.
Step 5: Review and alter any other sequence parameters, if required, such as frame rate and audio settings.
Step 6: Click “OK” to preserve the modifications and apply the new aspect ratio to the sequence.
Final Thought
In conclusion, mastering the process of adjusting the aspect ratio in Premiere Pro is crucial for producing consistent results and obtaining the appropriate visual appearance in your video editing projects. You now know how to use Premiere Pro to change aspect ratios for cinematic widescreen presentations or vertical formats for social media thanks to the detailed directions in this tutorial.
You may improve the visual impact of your videos and engage viewers more deeply by understanding the technical and creative sides of aspect ratio adjustment. To create fascinating and immersive video experiences that leave a lasting impact, embrace the newly discovered creative freedom and experiment with various aspect ratios. Leave your comments below!