Glare can be a photographer’s bane — whether it’s obscuring a subject’s face in a portrait or compromising the clarity of a scenic landscape. It can transform an excellent photo into a mediocre one by introducing unwanted bright spots and reflections that detract from the overall image. Fortunately, with the advent of sophisticated image editing tools and techniques, there are proven methods to combat this issue effectively. Here we introduce 3 tried and tested strategies for removing glare from photos, each with its advantages and best-use scenarios.

Remove Glare from Photo
Table of Contents: hide
What Causes Light Glare in Photos?
Remove Glare from Photo via AI
Remove Glare from Photo via Clone Stamp Tool
What Causes Light Glare in Photos?
Glare refers to the reflection of light sources off surfaces in the frame. It appears as very bright, washed-out areas.

Light Glare in Photos
Glare is typically caused by direct light sources like the sun, flash, or other bright indoor/outdoor lighting hitting a reflective surface like glass, water, or any glossy surface in the photo. Small glare spots aren’t too problematic but large or multiple areas of glare can ruin an image.
Therefore, glare is often unwanted light reflection in an image that obscures intended details and needs to be removed for a professional finish.
Remove Glare from Photo via AI
Using an AI Watermark Removal App, you can automatically detect and diminish glare with just a few clicks. This allows even novice image editors to produce professional-looking results. Apps like Wipit have revolutionized the process of removing glare from photos thanks to machine learning technologies. With a simple image selection, the app’s algorithms go to work analyzing and processing the pixels. Within moments, it provides a glare-free preview that can be instantly applied. In this part, we will explore how Wipit has revolutionized removing glare from photos.
Before removing glare from photos, let’s check the key features of Wipit
- Remove glare, hair, wrinkles, tattoo, and even eye bags from photos.
- Erase text, emojis, dates, and other kinds of watermarks from videos and pictures with ease.
- Preserve the image and video quality after erasing the unwanted objects.
- Upload a watermark to your image or video to protect its privacy.
Steps to remove glare from photo via AI
Step 1. Free install Wipit on your computer and upload the photo with glare.

Upload Images from Your Computer
Step 2. Tap AI Select Area to frame the glare you need to erase on your photo.

Frame the Unwanted Object on Photo by AI
Step 3. Click on the Preview button to check the glare removal effect.
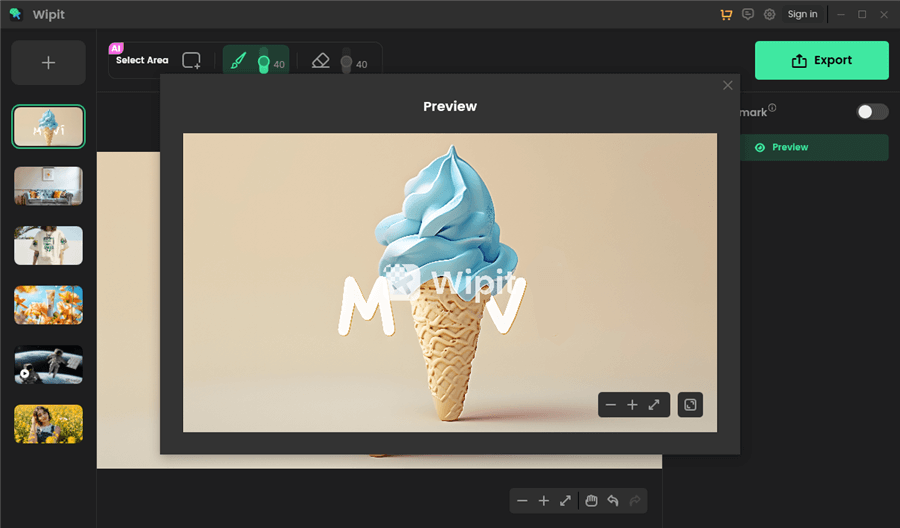
Preview the Object Removal Effect
Remove Glare from Photo via Clone Stamp Tool
You can remove glare from Photos via Photoshop’s Clone Stamp Tool. This provides precise control over the editing process, allowing you to select the exact source pixels that will replace the glare. This level of precision is essential when working on complex areas, such as those with detailed patterns or varying textures.
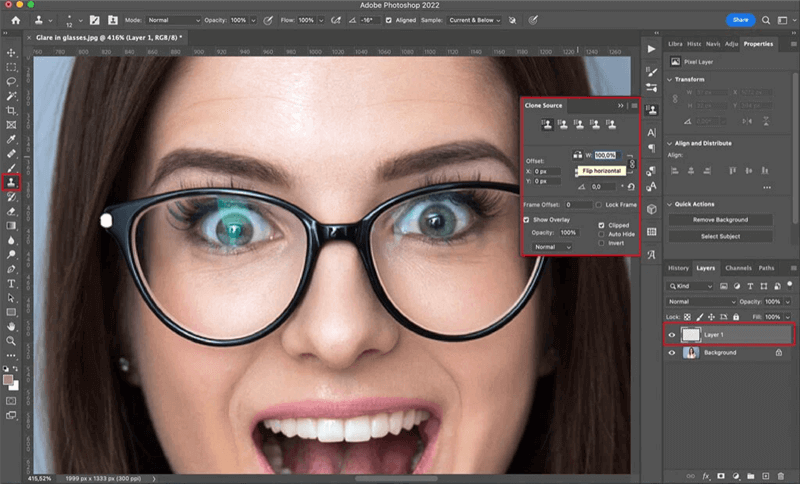
Remove Glare from Photo via Clone Stamp Tool
Step 1. Launch your image editing tool and open the photo that has glare.
Step 2. Duplicate the background layer to preserve the original image.
Step 3. Use the Healing Brush Tool to paint over the glare. Alt-click (Option-click on Mac) to define a good source area without glare, then paint over the glare to replace it with the sampled pixels.
Step 4. Select the Clone Stamp Tool for areas that require more control. Set the source area by Alt-clicking (Option-clicking on Mac) on a similar texture without glare. Paint over the glare to replace it with the texture from the source area.
Remove Glare from Photo via Magic Wand Tool
Simulating the effect of a polarizing filter in post-processing is a technique used to reduce or eliminate glare from photos after they have been taken. While actual polarizing filters adjust the light entering the lens, the simulated effect in post-processing aims to replicate the filter’s impact on reducing reflections and increasing color saturation.
Here, you can mimic the effect and remove glare from photos using GIMP’s Magic Wand tool.
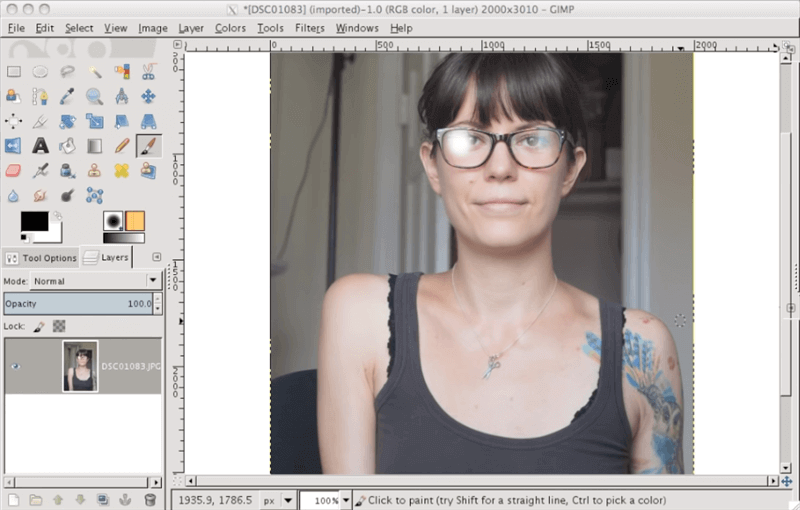
Remove Glare from Photo via Magic Wand Tool
Step 1. Start by opening the image you want to edit in GIMP.
Step 2. Choose the Magic Wand tool to select the area affected by glare. If the glare is over a large area, you might want to work in sections.
Step 3. Polarizing filters often reduce the brightness of the glare and slightly desaturate it. If the effect is too strong or not adequately localized, use layer masks to fine-tune the adjustments.
Step 4. If you’re satisfied with the effect, you can merge your adjustment layers with the duplicate background.
Faqs About Removing Glare from Photo
By the end of the post, we’ll address several questions about removing glare from photos.
Can you completely remove glare?
It’s difficult to completely erase all signs of glare, but editing tools can minimize it to look natural. Some residual light may remain depending on the glare levels.
Can glare removal damage the quality of a photo?
If done improperly, glare removal can affect the photo’s quality, making it look unnatural or causing a loss of detail. Careful use of editing tools is essential to maintain image quality.
What’s the best way to prevent glare in the first place?
Shoot at an angle that avoids direct light sources. Diffuse strong lighting, wear sunglasses outside, and adjust camera settings based on lighting conditions.
The Bottom Line
Each method comes with its own set of pros and cons, and the choice of which one to use will depend on factors such as the severity and type of glare, the complexity of the image, the desired outcome, and the user’s level of expertise in photo editing. In the following sections, we will delve deeper into these methods, providing insights and step-by-step guidance on how to remove glare from your photos effectively, thus enhancing their quality and visual impact.