Video stabilization is a vital technique in the world of video production and video editing, allowing creators to eliminate unwanted camera movement and achieve smoother, more professional-looking footage. Whether you’re capturing action-packed moments on a handheld device or dealing with shaky footage due to external factors, stabilizing a video can significantly enhance its visual quality.

How to Stabilize a Video?
In this guide, we will explore various methods and tools to stabilize videos, from basic techniques to advanced software solutions. Whether you’re a beginner or an experienced video editor, the following steps will help you transform shaky footage into steady, captivating visuals.
Table of Contents: hide
Does Video Stabilization Reduce Quality?
Does Video Stabilization Reduce Quality?
Video stabilization techniques can potentially affect the quality of a video, although the impact can vary depending on the specific stabilization method used and the quality of the original footage.
When applying video stabilization, software or algorithms analyze the motion in the footage and attempt to compensate for camera shake or unwanted movement. This compensation often involves cropping or scaling the video, as well as applying digital adjustments.

Video Stabilization
Here are a few ways in which video stabilization can potentially affect video quality:
- Crop or scaling: To stabilize the footage, software may crop or scale the video slightly. This can result in a reduction in the field of view or a decrease in the overall resolution of the video. The extent of the cropping or scaling depends on the severity of the camera shake and the stabilization algorithm being used. In some cases, this can lead to a noticeable loss of quality or a change in the framing of the video.
- Warping or distortion: Video stabilization algorithms may introduce slight warping or distortion in the stabilized footage. This can occur as the software attempts to align and compensate for camera movement. While modern stabilization algorithms aim to minimize these artifacts, there can still be some residual effects, especially in challenging stabilization scenarios or with lower-quality footage.
- Loss of detail: In the process of stabilizing a video, some fine details may be smoothed out or lost. This can happen if the software applies blurring or averaging techniques to reduce the visibility of the camera shake. While this is generally more subtle and may not be noticeable in many cases, it can result in a slight reduction in overall detail and sharpness.
What Happens When You Stabilize a Video?
When you stabilize a video, the software or algorithm analyzes the frames to detect camera movement and shaking. It then applies motion compensation techniques to counteract the detected motion, utilizing transformations such as translation, rotation, and scaling. The software adjusts the frames, aligning them to create a smoother and more stable video. This process may involve cropping or scaling the footage, potentially affecting the field of view or resolution. The goal is to reduce unwanted camera movement and improve the overall visual stability of the video.
How to Stabilize Video on PC?
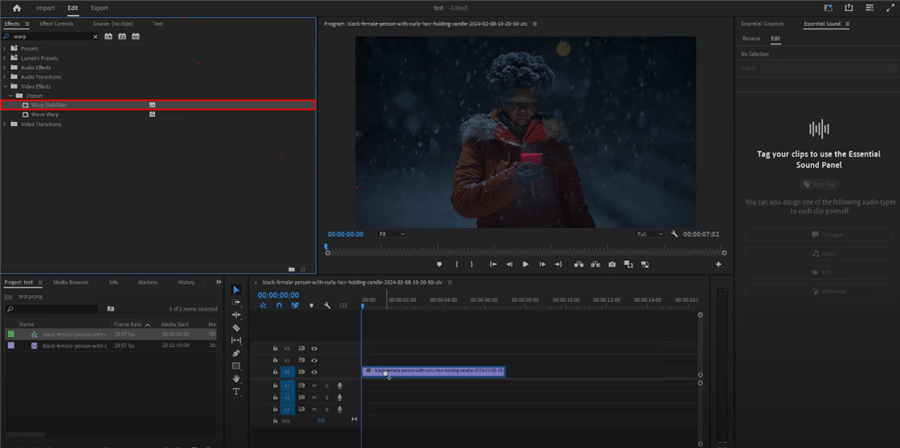
To stabilize video on a PC, you can use various video editing software options available for Windows. One popular choice is Adobe Premiere Pro, which offers a built-in stabilization feature called Warp Stabilizer. Here’s a step-by-step guide on how to use Adobe Premiere Pro to stabilize your video:
Stabilize Video on PC
Step 1. Install and open Adobe Premiere Pro. Click on “File” in the menu bar and select “New” > “Project”.
Step 2. In the Project panel, drag and drop your imported video onto the “New Item” icon at the bottom of the panel to create a new sequence. Then the video will appear in the timeline.
Step 3. In the Effects panel (usually located on the right side of the screen), search for “Warp Stabilizer”. Drag and drop the Warp Stabilizer effect onto your video clip in the timeline.
Step 4. With the video clip selected, go to the Effect Controls panel. Under the Warp Stabilizer effect, you’ll find various settings to adjust the stabilization.
After applying the Warp Stabilizer effect, Premiere Pro will automatically start analyzing the video to determine the necessary stabilization adjustments.
How to Stabilize Video on Mac/iOS?
iMovie is a popular video editing software for macOS and iOS devices that offers a simple and intuitive way to stabilize shaky videos. Here’s a step-by-step guide on how to use iMovie to stabilize your video:

How to Stabilize Video on Mac/iOS
Step 1. Open iMovie on your Mac or iOS device. Click on the “Create New” button and select “Movie” from the options. Import the shaky video you want to stabilize.
Step 2. With the video clip selected, click on the “Stabilization” button in the toolbar above the timeline. iMovie will analyze the video and apply the stabilization effect automatically.
Step 3. Play back the video in the iMovie preview window to see the results of the stabilization. Look for any improvements in the video’s smoothness and reduction of camera shake.
Step 4. Once you’re happy with the stabilized video, click on the “Share” button in the toolbar.
Final Thought
In conclusion, video stabilization is a crucial step in the post-production process that can greatly improve the quality and professional appearance of your footage. By eliminating unwanted camera shakes and movements, you can create smoother, more visually appealing videos that captivate your audience. Throughout this guide, we’ve discussed different methods and tools for stabilizing videos, ranging from built-in features in video editing software to dedicated stabilization applications. It’s important to choose the method that best suits your needs, taking into account factors such as the level of stabilization required, the complexity of the footage, and the available resources. With practice and experimentation, you can master the art of video stabilization and enhance the overall quality of your videos, ensuring a more enjoyable viewing experience for your audience.