The cinematic value of music is well-documented, as nearly every great movie has a memorable soundtrack as its companion. The relationship between video and music remains essential in the era of digital content where music is often a key part of a viral clip. If the connection is skillfully made, the effect on the viewer can be quite dramatic and long-lasting.

How to Fade in and Fade Out Music
With this in mind, videographers and content creators would be wise to start focusing on music early in their careers. Learning how to fade in and fade out music during a critical scene goes a long way toward establishing an expressive style and directing the imagination of the audience. This technique can be adopted relatively quickly, and could instantly improve the quality of the videos you make. You can find out some basic information about this topic along with detailed step-by-step instructions in this article.
What is the Role of Music in Videos?
To put it simply, music adds an extra dimension to any visual content and introduces an emotional element that can amplify the impact of images. Some videos feature music throughout, while in longer formats it’s used only occasionally when there is a good reason. Music can fill the background and add to the tension, foreshadow a dramatic event that is just about to happen or accompany action to give it a smoother rhythm and more natural flow.
Of course, the type of music that fits best depends on the type of video and the particular scene in which it’s used. The same can be said for sound effects that change how music is presented, such as audio transitions. Authors who understand how to incorporate music into their multimedia work stand a much better chance of connecting with the audiences and getting their points across. That’s why it’s worth dedicating some time to this aspect of the craft and learning creative ways to utilize music when putting together videos.
What Are Fade-in and Fade-out Effects?
There are numerous sound editing techniques that can be handy when you need to fit a musical score into a video. Perhaps the most common one involves manipulating the sound volume and gradually increasing or decreasing it as the scene progresses. When the volume is slowly turned up, the effect is called a fade-in while in the opposite case, it is a fade-out. Either of these effects can be commonly found on videos of many different kinds, typically used in a strategic way to separate individual scenes.
The practical impact of these effects is predicated on the properties of human perception. A sound that is gradually becoming louder naturally builds anticipation and makes the scene more intense, especially once the music reaches full volume. On the other hand, a sound that slowly disappears tends to bring closure and allows the viewer to process the previously seen events. Because of this, up-tempo music is often used with a fade-in while more peaceful harmonies are better for fading out.
How to Fade in and Fade out Music in Windows?
PC users have many different video editing tools to choose from, but in this case, it’s best to select one that lets you edit the sound as a separate channel. Probably the wisest choice is Adobe Premiere, which supports the timeline view with an audio channel but has an interface that even beginners can get around easily. We will explain the exact procedure for executing fade-in/fade-out effects on a musical score you want to add to your video:
Step 1: Open your video in Premiere and position the music track you would like to use in the right place on the timeline
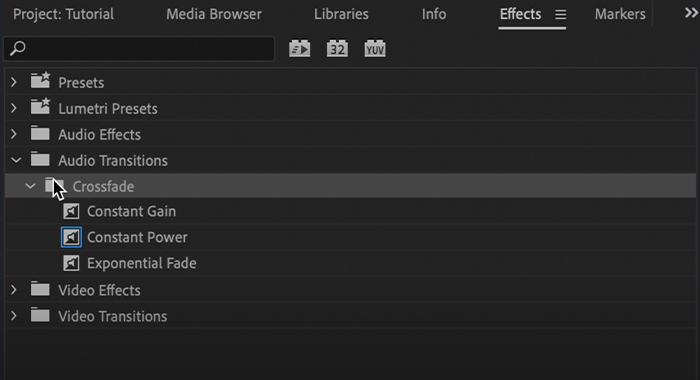
Step 2: Go to the Effects menu, choose Audio Transitions, then finally select Crossfade

Choose Audio Transitions
Step 3: Choose the Constant Gain option if you want to get a fade-in, or Exponential Fade if your objective is to get a fade-out effect
Step 4: Add the effect to your timeline and define its duration by clicking on it and dragging the cursor
How to Fade in and Fade out Music on a Mac?
There are equally good video editing tools for Mac owners, including a very popular program that comes preinstalled on every machine. iMovie is a great application that lets you add music and implement various effects on it, and it’s more accessible to beginners than most of the alternatives. In particular, fading the music in or out of a scene is very straightforward to do, and we will explain the exact steps you need to take to realize this idea.
Step 1: Run iMovie on your Mac and open the video project you would like to edit
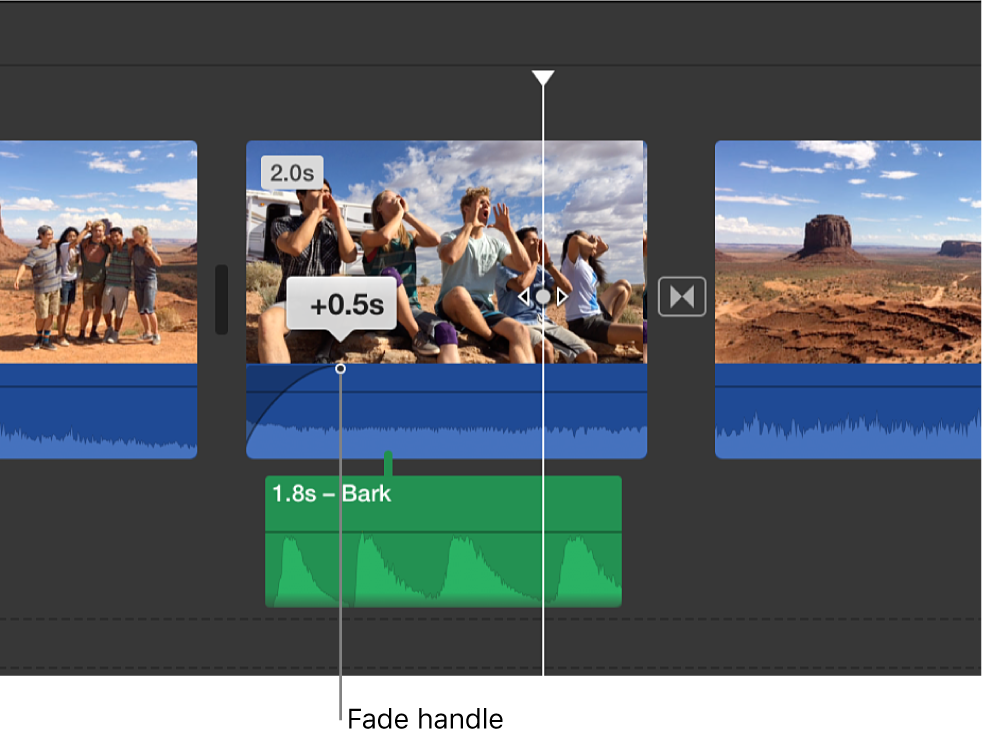
Step 2: Find the scene where a fade is needed, and hover your mouse over the audio channel

Fade in and Fade out Music on a Mac
Step 3: After fade handles are revealed, drag and drop them to the desired positions
Step 4: Placing a fade handle at the start of the scene automatically generates a fade-in, while positioning it at the end results in a fade-out
Frequently Asked Questions about Using Fade-in and Fade-Out Effects
1. Should I always use the same audio effect for all transitions in my video?
Many authors choose to put fades in all of their transitions, and this can work fine if the subject matter allows it. However, there are some videos in which some scenes have no music at all, so they are naturally not suitable for using uniform transitions everywhere.
2. For how long should the fade-in and fade-out effects be active?
In most cases, a fade-in or fade-out effect lasts only a few seconds. Of course, no formal rules are limiting how long it could possibly take to reach the full volume of music. This is something you can experiment with and find the ideal duration for every scene.
3. Can I use both fade-in and fade-out for the same scene?
This could be a viable option if the same musical piece is spanning the entire scene. A fade-in could be followed by a period of full-volume sound, after which a fade-out would occur. However, having full-volume sound in the middle of the scene is impractical if there is any spoken content in it.
Final Thoughts
Combining visuals and audio can lead to amazing results if you know what you want and understand how to achieve it. Fade-in and fade-out effects can be great expressive means that allow for more nuanced communication with the audience. Since those effects are very easy to realize on both Windows and Mac, it’s prudent to start practicing how to fade out music in your videos at home. After a while, you will find out how to maximize the psychological impact of your transitions, allowing you to make more powerful video content.


