In today’s fast-paced digital world, creating engaging video content is essential for capturing your audience’s attention. Whether you’re a content creator, social media influencer, or business owner, adding captions to your videos can significantly enhance their accessibility and overall impact.
CapCut, a popular video editing app, offers a convenient solution for adding auto-captions to your videos quickly and easily. In this blog post, we’ll guide you through the process of adding auto captions in CapCut, ensuring that your videos reach a wider audience and leave a lasting impression.

How to Add Auto Captions in CapCut
Table of Contents: hide
How to Add Auto Captions Easily in CapCut
Pros and Cons of CapCut Caption
What is CapCut?
CapCut is a powerful and user-friendly video editing app designed for both iOS and Android devices. CapCut offers a wide range of editing tools and features that allow users to create professional-looking videos with ease.
One of the standout features of CapCut is its auto caption functionality, which enables users to quickly and easily add captions to their TikTok videos. This feature automatically generates captions based on the audio in the video, saving users time and effort compared to manually transcribing and adding captions. CapCut’s auto caption feature not only enhances video accessibility for a wider audience but also improves SEO by providing search engines with text-based content, making it a valuable tool for content creators and businesses looking to optimize their video content.
How to Add Auto Captions Easily in CapCut
On CapCut Web Version
Adding captions to your videos using CapCut’s web version is a simple and effective way to make your content more accessible and engaging. Captions not only help viewers who are deaf or hard of hearing understand your video’s audio content but also make it easier for people to watch your videos in sound-sensitive environments, such as the workplace or public transportation. CapCut’s web version offers a user-friendly interface that allows you to add captions to your videos quickly and easily.
Steps to add captions to a video on CapCut’s web version:
Step 1: Open your web browser and navigate to the CapCut website.
Step 2: Click on the “Start Editing” button to launch the web-based video editor.
Step 3: Click on the “New project” button and select “Import” to upload the video you want to add captions to from your computer.
Step 4: Once your video is imported, click on the “Text” button in the left-hand toolbar.
Step 5: Click on the “Auto Caption” button to automatically generate captions based on the video’s audio content.
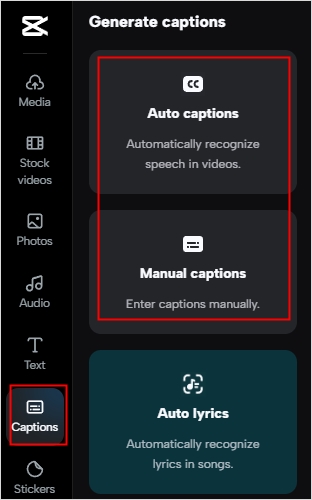
Choose Auto-Caption
Step 6: Review the generated captions and make any necessary edits by clicking on the text and modifying it in the text box that appears.
Step 7: Adjust the timing of your captions by dragging the text boxes along the timeline at the bottom of the screen.
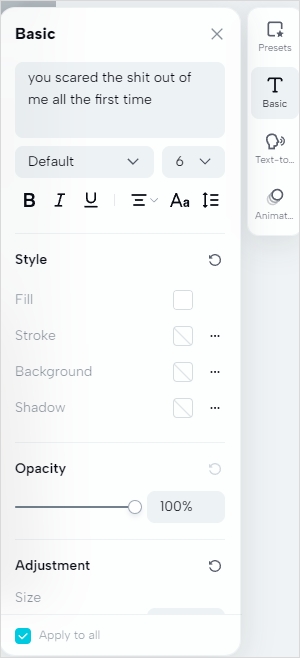
Adjust the Caption
Step 8: Customize the appearance of your captions by selecting the text and using the options in the right-hand panel to change the font, color, size, and alignment.
Step 9: Once you’re satisfied with your captions, click on the “Export” button in the top right corner of the screen.
On Mobile Device
Adding auto-captions to your videos in CapCut is a straightforward process that can be completed in just a few simple steps. By leveraging the app’s built-in auto caption feature, you can save time and effort while ensuring that your videos are accessible to a broader audience, including those who are deaf or hard of hearing or those who prefer to watch videos with the sound off.
The steps to add subtitles on the desktop version of CapCut are similar to those on the mobile platform.
Here’s how to add auto captions in CapCut:
Step 1: Open the Capcut app on your mobile device or PC.
Step 2: Click the “+” sign to start a new project and import the video to which you want to add captions.
Step 3: Next, select the “Text” icon and click “Auto-caption.” Toggle on “Dynamic captions” to allow Capcut access to the video and generate captions automatically. Then hit “Start.”
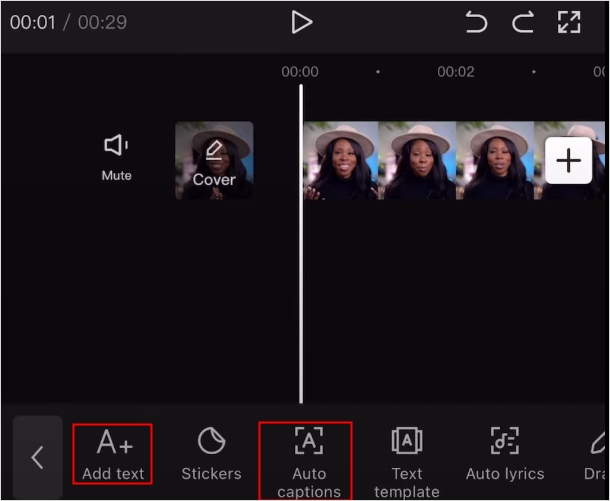
Choose Add Text or Auto Caption
Step 4: Review the generated captions and make any necessary edits or adjustments to ensure accuracy and clarity.
Step 5: Customize the appearance of your captions by selecting a font style, size, and color that complements your video’s overall aesthetic.
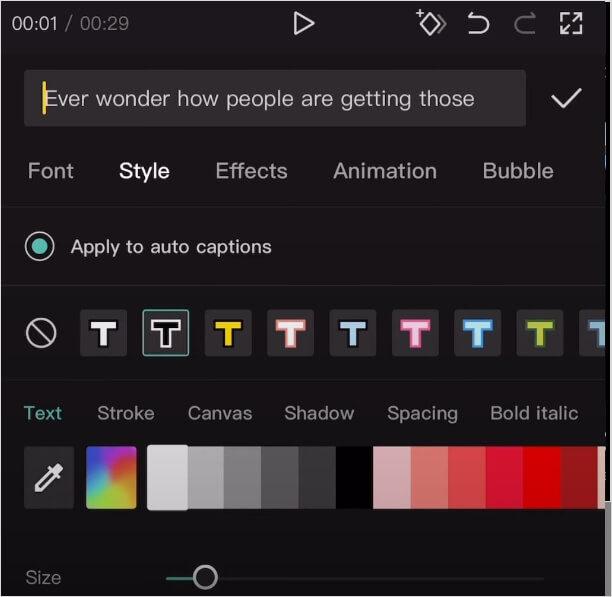
Customize the appearance of your captions
Step 6: Position the captions on the screen to ensure they are easily readable and do not obstruct any important visual elements.
Step 7: Once you’re satisfied with your captions, tap the “Done” button to apply them to your video.
Pros and Cons of CapCut Caption
CapCut has a range of unique features, with automatic subtitles being one of its most famous products. While automatic subtitles offer various benefits, they also have their limitations. Before delving into the process of creating automatic subtitles in CapCut, it is crucial to understand these advantages and disadvantages. Below, we focus on some prominent pros and cons of CapCut’s automatic subtitle feature:
Pros of CapCut:
- CapCut’s automatic subtitle feature can quickly generate accurate subtitles, saving users valuable time. Additionally, these subtitles can be manually adjusted and reused for other parts of the video.
- The automatic subtitle feature supports multiple languages, making CapCut a globally accessible platform for users from different regions.
- Recent advancements in automatic subtitle technology have made transcriptions more precise, ensuring accurate and reliable conveyance of information through subtitles.
Cons of CapCut:
- When using the auto-generated subtitle feature, users may encounter limitations regarding supported languages and customization options.
- Despite advancements in automatic subtitle technology, users may still encounter some issues when using this feature.
- CapCut’s automatic subtitle feature does not include manual editing options, which may pose difficulties for users working on critical or high-risk projects. In such cases, users may need to invest significant time in ensuring a thorough review and refinement of the subtitles.
Bonus Tips: Add a caption automatically with AI
CapCut is a powerful video editing software, but it is more suitable for adding subtitles to long videos. If you want to add eye-catching subtitles with emojis, sound effects, and special effects to short captions on Instagram Reels, YouTube Shorts, and TikTok, CapUp is your best choice. CapUp is a powerful AI subtitle generator that can generate eye-catching subtitles for short video content within minutes. CapUp features automatic subtitle generation and multiple subtitle templates inspired by top influencers, allowing you to easily create viral videos like Mr. Beast with just a few clicks.
Top Features
- An AI-powered caption generator that swiftly produces precise video subtitles.
- Employ advanced AI technology to analyze subtitles, resulting in captivating zoom effects, enriched visuals, and engaged viewers.
- Enhance your videos with remarkable sound effects, incorporating popular sounds and effects to create an immersive viewing experience.
- Add liveliness and expression to your content by using AI to match video subtitles with emojis.
- Boost viewer engagement and popularity by choosing captivating moments or stunning photos as custom video covers.
Here are the steps to add captions to short videos via CapUp
Step 1: Log in to CapUp and easily upload videos by dragging and dropping them from your computer.

Log in and Upload the Video
Step 2: Select the language of the currently uploaded video from the drop-down menu. CapUp supports English, German, Spanish, French, Portuguese, and 12 other languages.

Select the Language that Matches Your Video
Step 3: Click “Templates” to choose from a variety of top influencer templates and adjust fonts, sound effects, emoticons, and other parameters to your liking. Then, click “Save as Template” to save your default template as a custom template.
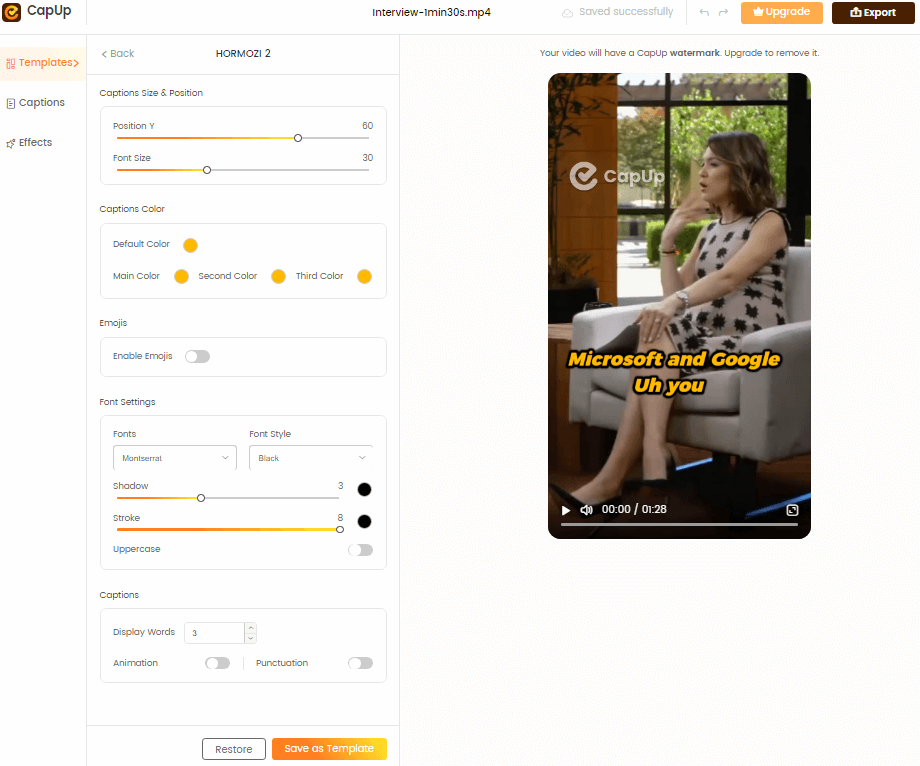
Add Captions to Video Automatically with AI
Step 4: Give CapUp some time to generate eye-catching videos for you. Then, click “Captions” and “Effects” to customize the fonts, emoticons, sound effects, and animations of the subtitles.
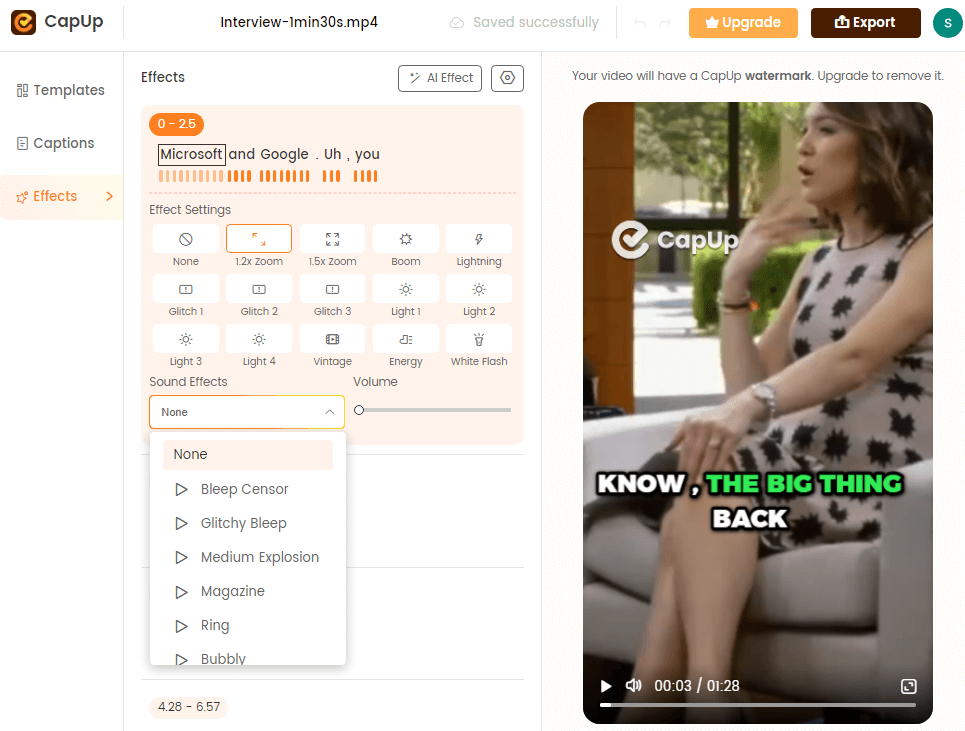
CapUp – Outstanding Sound Effects
Step 5: Enhance your video by uploading attractive images or adding an attractive cover by selecting a satisfactory frame from your video. Once satisfied, click “Export” to save the video.

Export the Video
FAQs of Adding Caption in CapCut
1. Are the captions added in CapCut compatible with other social media platforms?
Yes, the captions added in CapCut will be embedded in your video file, making them compatible with various social media platforms like TikTok, Instagram, and YouTube.
2. Can I customize the appearance of the captions in CapCut?
Yes, CapCut allows you to select the font style, size, and color of your captions to match your video’s aesthetic.
3. Do I need an internet connection to add auto captions in CapCut?
Yes, an internet connection is required to use the auto caption feature in CapCut, as the app relies on online servers to process the audio and generate captions.
Conclusion
Adding auto-captions to your videos using CapCut is a quick and efficient way to enhance your content’s accessibility and engagement. By following the simple steps outlined in this blog post, you can easily incorporate captions into your videos, ensuring that your message reaches a broader audience and leaves a lasting impact. While the auto caption feature may have some limitations, its benefits far outweigh the drawbacks, making it a valuable tool for any content creator or business looking to elevate their video content. So, go ahead and give CapCut’s auto caption feature a try, and watch your videos soar to new heights!
