The Sims 4 is all about creating stories, whether it’s building dream homes, leading dramatic relationships, or just laughing at the chaotic antics your Sims engage in. What better way to share exciting moments than by recording your gameplay?
Whether you’re a seasoned YouTuber creating epic Let’s Plays or just looking to capture a hilarious Sim mishap to share with friends, this guide has you covered. We’ll explore different recording methods for Sims 4 gameplay, catering to PC, Mac, and even free software options. Let’s record something!
Table of Contents: hide
How to Record Sims 4 Gameplay with the Built-in Camera
How to Record Sims 4 Gameplay on Mac & Windows
How to Record Sims 4 Gameplay with the Built-in Camera
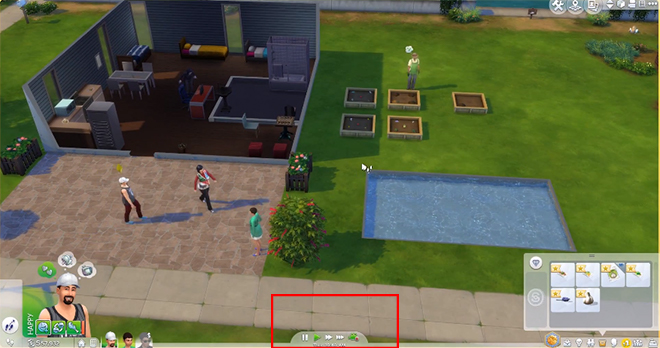
For quick and easy Sims 4 recordings, start with the game’s built-in recorder! It’s perfect for capturing short clips and can be activated with a simple hotkey. Here’s how to use it:
Step 1: Enter Tab Mode
Press the “Tab” key on your keyboard while in-game. This will switch you to a free camera mode.
Step 2: Adjust Your View
Use the WASD keys to move the camera and your mouse to pan and zoom.
Step 3: Start & Stop Recording
Press the “V” key to start recording. Press it again to stop.
Step 4: Find Your Recordings
Your recorded videos are saved in “Documents” > “Electronic Arts” > “The Sims 4” > “Recorded Videos.”
Find Your Recordings
Limitations: While convenient, the built-in recorder doesn’t capture audio and offers limited camera control.
How to Record Sims 4 Gameplay on Mac & Windows
For Sims 4 gamers seeking a smart screen recorder that works seamlessly on both Mac and Windows, especially for longer recording sessions, FocuSee comes highly recommended. Offering three recording modes – screen only, screen with audio, and screen, webcam, and audio combined – FocuSee provides the flexibility to capture your gameplay exactly how you want.
This makes it ideal for creating engaging content where you can share your reactions and commentary alongside your Sims 4 adventures. Ready to start recording? Check out the easy-to-follow tutorial below!
Step 1: Download and Install
Head to the FocuSee website and download the version for your operating system.
Step 2: Launch and Select Recording Area
Open FocuSee and choose the recording area encompassing your Sims 4 game window. You can drag the corners to resize the recording area precisely.
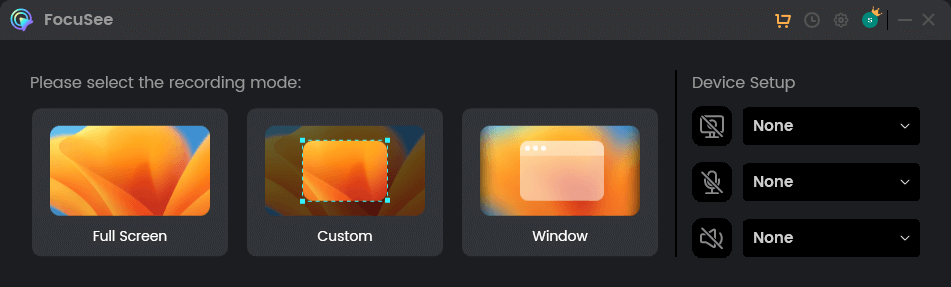
Choose the Recording Mode
Step 3: Adjust Settings
Choose your desired recording area (full screen or a specific window), audio source (system sounds or microphone), and output settings (video format, quality, etc.).
Step 4: Start Recording
Click the record button when you’re ready to capture your gameplay.
Step 5: Stop Recording
Hit the stop button when you’re finished, and FocuSee will save the video to your chosen location.
Step 6: Customize Your Video
After recording your video, FocuSee allows for easy editing: trim unwanted segments, adjust zoom levels for emphasis, add dynamic motion blur effects, and even automatically generate subtitles for enhanced accessibility.
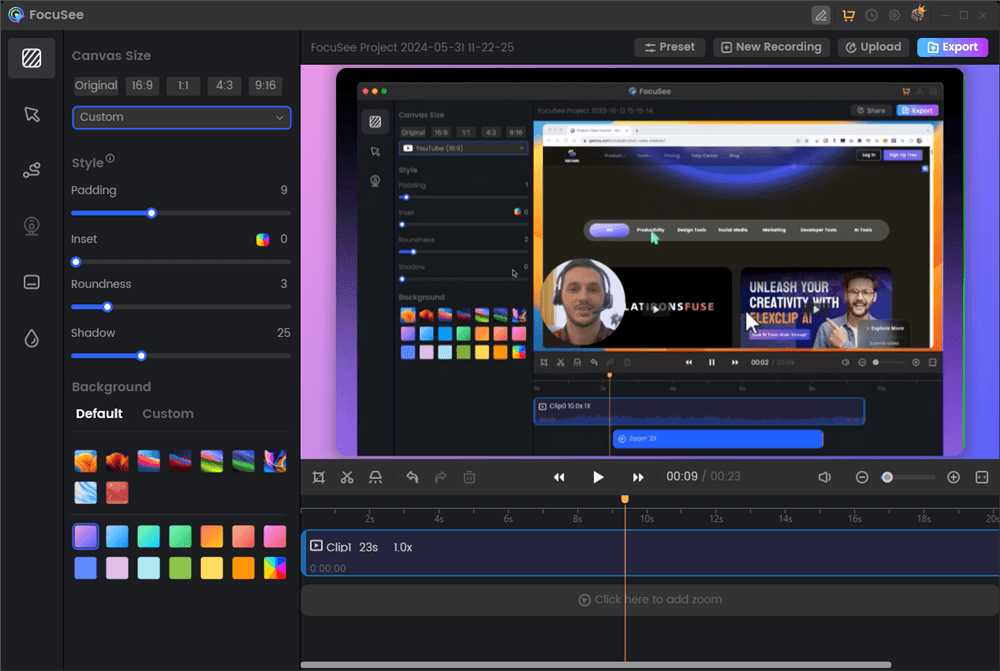
Screen Recording Editing Interface
How to Record Sims 4 Gameplay on PC: Xbox Game Bar
Windows 10 and 11 users have a built-in screen recording tool specifically for games: the Xbox Game Bar. This convenient feature enables you to instantly record your Sims 4 gameplay, share captures, and even communicate with Xbox friends across consoles and PCs, all without leaving your game.
Step 1: Open Game Bar
Press the Windows key + G while in-game to open the Xbox Game Bar overlay.

Record Google Translate Voice via Xbox Game Bar
Step 2: Start Recording
Click the “Record” button (red circle icon) or use the shortcut Windows key + Alt + R.
Step 3: Stop Recording
Click the “Stop” button (white square icon) when you’re done.
Step 4: Access Recordings
Find your captured videos in the “Captures” folder within your “Videos” directory.
How to Record Sims 4 Gameplay for Free: OBS Studio
OBS Studio is the top choice for Sims 4 gaming YouTubers looking to stream and record. This free, open-source software works on Mac and Windows and captures any screen. Create multiple scenes, add webcam and game sources, and even add overlays for a professional touch. Although the interface may seem complex at first, the recording process is quite simple and tutorials are readily available.
Step 1: Download and Install
Grab OBS Studio from the official website and install it.
Download and Install OBS Studio
Step 2: Create a Scene and Add Source
- Launch OBS Studio and create a new scene.
- Click the “+” button in the “Sources” panel and select “Game Capture.”
- Choose “Sims 4” as the application to capture.
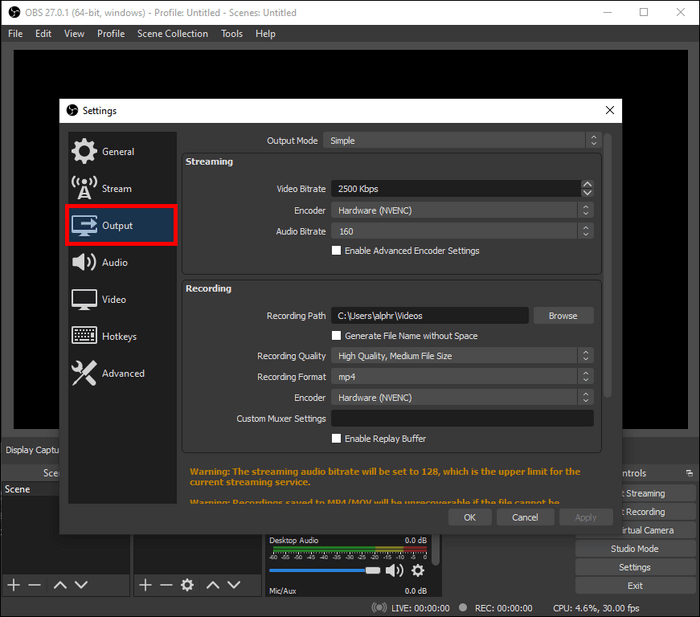
Step 3: Adjust Settings
Configure your resolution, frame rate, and audio input sources (microphone, game audio, or both).
Step 4: Start Recording
Hit the “Start Recording” button in the “Controls” panel.
Step 5: Stop Recording
Click “Stop Recording” when you’re finished, and OBS Studio will save the video to your chosen location.
Conclusion
From the simplicity of Sims 4’s built-in recorder to the powerful features of OBS Studio, there’s a perfect recording method for every Simmer. Try different options, find what suits your needs best. Start sharing your unique Sims 4 stories with the world!
What’s your preferred method for recording Sims 4 gameplay? Share your tips and tricks in the comments below! And don’t forget to check out our other Sims 4 guides for building, gameplay, and more. Happy Simming!