Google Docs is an impressive and flexible tool for creating different kinds of documents. It can be used for drafting professional texts, personal notes, and anything in between. One of its most useful features is inserting a background image into your documents. This is a great way to stand out from the crowd and add more creativity to your work.
Inserting an image behind the text in a Google Docs document is visually appealing and can attract the attention of the reader. Whether you need this for your university project, or you are a marketing person trying to promote a product, or a professional with a lucrative business, you could benefit a lot from having a presentable background.
In this article, we will cover different ways of putting a background behind text in Google Docs. We will discuss some of the questions people often have regarding this issue, and how to add a signature to your documents.
How do you put a background behind text in Google Docs?
There are many ways to put a background behind text in Google Docs, you can choose whatever method works best for you. We will present you now with the best ways to do this:
1. Using the Watermark Feature
The fastest and easiest way to insert a background in Google Docs is with the Watermark feature. This is a new feature that will mark all your pages with the same watermark, thus saving you a lot of time. There are two types of watermarks you can use -Text and Image, and both can look great when done the right way. Let’s have a look at the steps necessary to complete this action:
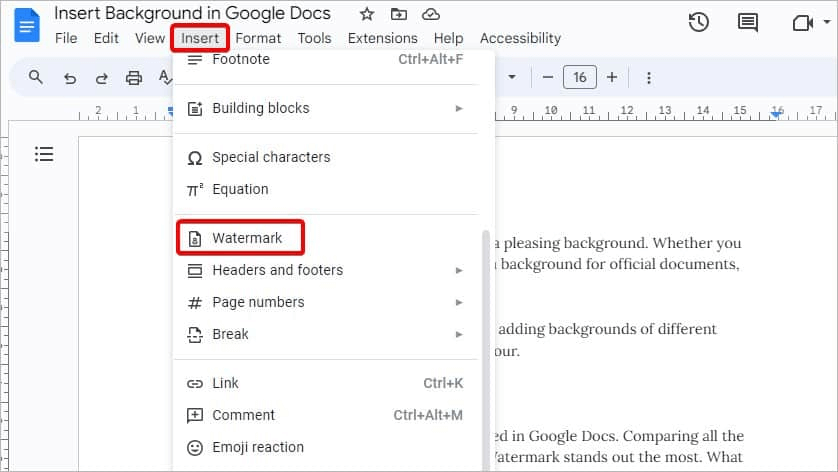
Step 1: Click on the ‘Insert ‘tab while your document is open in Google Docs
Step 2: Click on the ‘Watermark’ option from the drop-down menu

Click on the Watermark Option
Step 3: After you are presented with formatting options, choose ‘Image’> ‘Select Image’.
Step 4: Select your image after clicking on ‘Browse’
Step 5: After you choose and upload the image, you will see it as a background. It can also be moved to any place you want.
Step 6: Click on the ‘Done’ button.
2. Use Google Slides
Google Slides is a program for creating slideshow presentations. It can be used to present information in a precise way and in many different formats. This is an online platform, so it can be accessed from any type of device is the most convenient for you. These are some steps you need to follow if you want to put a background in Google Slides.
Step 1: Run Google Slides, and start a new presentation or open an existing one
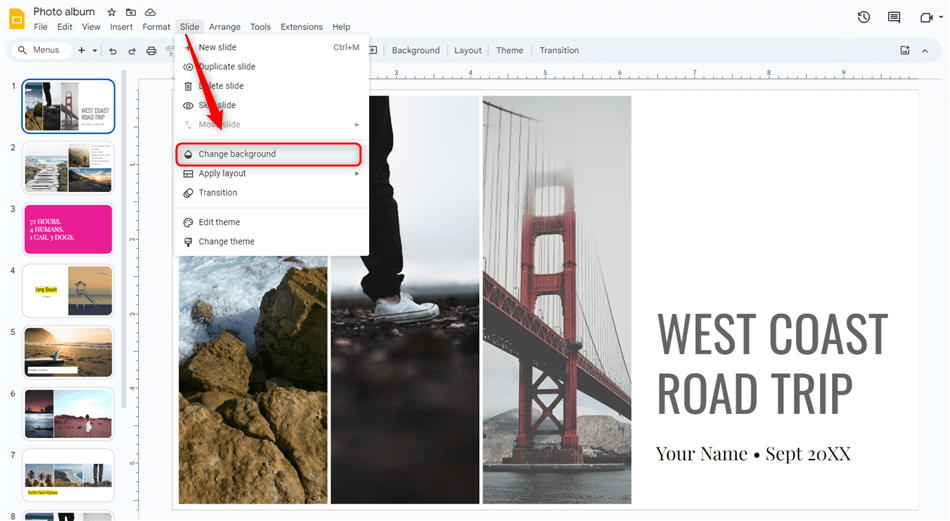
Step 2: Find the image by navigating to the ‘Slide’ tab, which is at the top, and from there choose ‘Change background’, then ‘Choose image’. You can also find images from your computer just by clicking on ‘Browse’, search for them online, or find some in your Drive or Photos folders in the cloud.

Choose the Change Background Button
Step 3. When you find the image you want, select it and click ‘Insert’. The image will be uploaded to the slide.
Step 4. If you want to add some text to your slide, choose ‘Insert’ and ‘Text box’. There are more options here. If you choose ‘Slide’ and ‘Apply layout’, you can change its size, color, font, and many other parameters. For background options, click on the ‘Background’ tab, and have a look at the dialogue box for more background options.
Step 5. Save the slide you just made to your computer as a PNG image, which you can upload to Google Docs and use as a background.
How to Add a Signature in Google Docs?
Adding a signature in Google Docs is a very simple task that can be done with just a few simple actions. Google Docs is a great tool for editing and creating documents that can be used for various purposes. We sometimes need signatures on our documents, and this is another example of how Google Docs can come in handy. Since there is not a built-in feature for signatures, there are other steps you can use instead:
Step 1: Open the Google document that you want to sign
Step 2: Position the cursor on the line where you want your signature to be
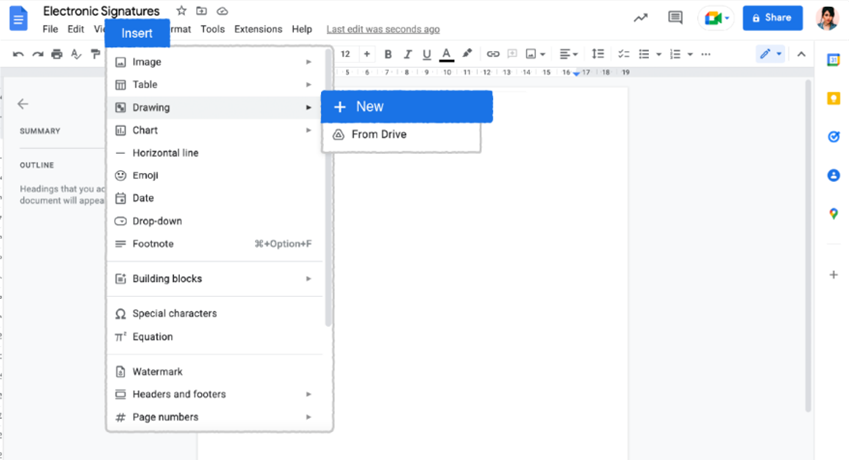
Step 3: Choose ‘insert’, then ‘Drawing’, and then click on “New’

Add a Signature in Google Docs
Step 4: Choose ‘Scribble’ tool from the ‘Drawing’ toolbar and sign the document using your mouse to draw the line
Step 5: When you are satisfied with how your signature looks, choose ‘Save’
There are also some other ways to add a signature in Google Docs. One is to insert an image of your signature into Google Docs. First, you need to take a picture of your signature or scan a printed version of it, then save it to your Google Drive or hard disc. When you open your Google document, you can upload the signature from your computer and insert it as an image. There are also some signature extensions you could use, but this might not be completely safe as you might need to allow access to some of your data for such apps to work.
FAQS About Insert a Background In Google Docs
How do I add a background to a specific page in my Google Docs document?
Just open the document, find the ‘Page Setup’ option and click on it. After this, choose the ‘Page Color’ drop-down menu, and choose the ‘Select Picture’ button. After applying the picture, choose the ‘Page Range’ and state on which pages you want the background to appear.
How to remove the background from my Google Docs document?
If you want to remove the background, you need to open the document, choose the ‘Page Setup’ item, then choose the ‘Page Color’ drop-down menu and select the ‘No Color’ option. By clicking on the OK button, you will successfully remove the background.
What are the benefits of putting an image behind text in Google Docs?
This can help people to understand texts better, especially if you want to explain something complex. Images are more appealing than text, and they can easily capture people’s attention. This is especially important if you are presenting a business proposal. Also, if you add images behind the text, the document will leave a more professional and more innovative impression.
Final Words
Inserting a background in Google Docs can add a touch of professionalism and increase the chances that your document will be taken seriously. There are a couple of ways to insert a background that we explained in this article, and you can also add signatures to your documents to make them even more formally decorated. All of the methods we described are simple but may require some practice, so you should try different possibilities on a document you don’t intend to share before settling for the best procedure.
