Capturing screenshots on PicsArt is a valuable skill every avid user should possess. Whether you want to showcase your screenshot editing prowess or update your screenshot and share it with others, knowing how to capture screenshots can be immensely useful. This article will explore various methods to capture PicsArt screenshots easily.
By the end of this article, readers will have a comprehensive understanding of multiple methods to capture stunning PicsArt screenshots. Regardless of your experience level, this guide will arm you with the knowledge you need to capture your editing abilities properly. So, let’s start to learn how to screenshot Picsart!
What Is PicsArt?
A famous photo and video editing application called PicsArt gives users access to various imaginative tools and features that they may use to improve and change their visual content. PicsArt has developed into one of the top platforms for creating and sharing graphic material due to its powerful editing features, social networking components, and active community.
Screenshot Picsart
It offers customers various editing tools and effects to radically change their images and videos. Users can use advanced editing methods like blending modes and masking, filters, color correction, text, collage-making, and text addition. The app also provides a sizable selection of frames, backdrops, stickers, and clipart for users to customize their works.
PicsArt goes beyond essential editing functions by offering a social networking component. It boasts millions of active users worldwide, from beginners in photography to established artists. With availability on both iOS and Android devices, the app ensures accessibility for a diverse user base.
How to Screenshot Picsart?
In digital creativity, taking a screenshot with PicsArt is quite essential. It allows users to record and save their creative endeavors, successfully capturing their processes and exposing their original vision to the world. Screenshots help artists to track their progress and share it with others by providing visual evidence of their artistic development.
These screenshots can be used to build a portfolio, share on social media, or even for self-reflection and development. By taking screenshots of PicsArt, users may preserve their talent and encourage others to discover their creative potential, thereby building a thriving community of digital artists. Continue reading to learn more about taking Picsart screenshots on different devices!
Take a Screenshot in Picsart Windows
GemooSnap is revolutionary software that empowers users to capture and enhance screenshots, offering a wide range of possibilities for effective communication and collaboration. With GemooSnap, you can effortlessly capture yourself and your screen, clearly and concisely conveying your thoughts and ideas. It allows you to create expressive documents by combining text, videos, images, and audio, enabling you to create captivating visuals that leave a lasting impact.
With its intuitive organization features, such as Screenshot Feedback, Screenshot & Beautify, Quick Screenshot, and Slide view, GemooSnap ensures that you and your team stay organized and on track. It embodies the essence of fun, creativity, and limitless possibilities in communication and collaboration. Here are the steps to take screenshots in Picsart Windows via Gemoo Snap.
Step 1: Download and install the Gemoo Snap on your PC. Launch the Gemoo Snap and sign in with your credentials.
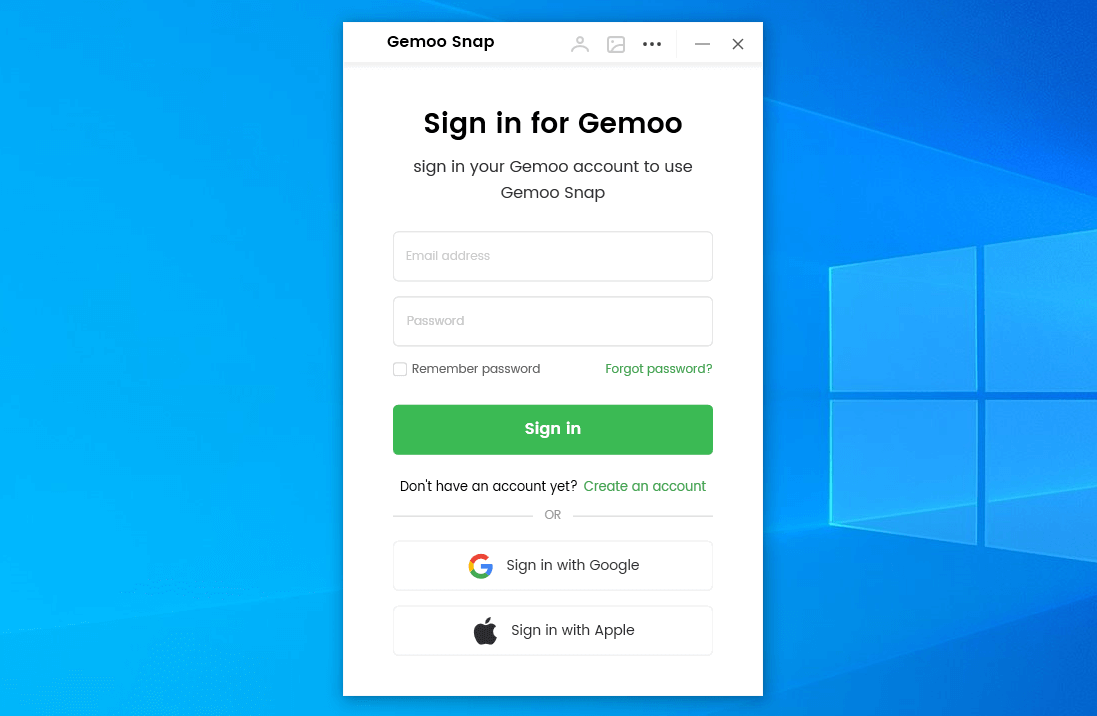
Sign in to Gemoo Snap
Step 2: Once logged in, click on Clipboard Screenshot from the menu.
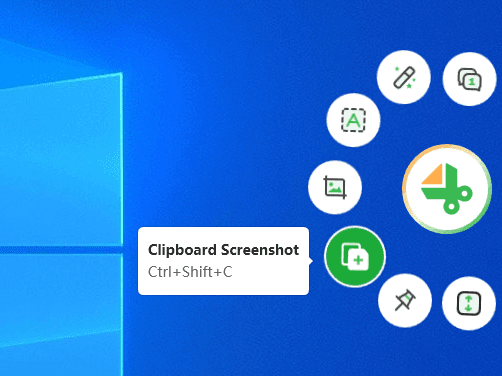
Select Clipboard Screenshot
Step 3: Launch PicsArt on your PC and navigate to the screen or image you want to capture. Click and drag the mouse to select the area to capture. And then you can annotate your screenshots from the available options.
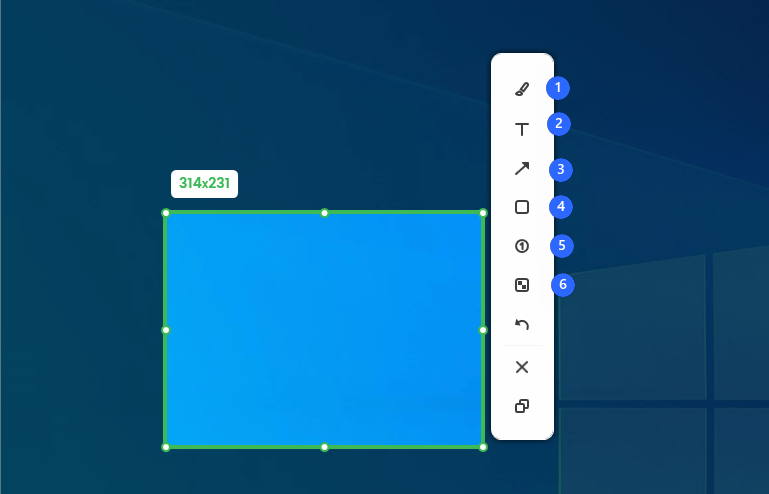
Annotate the Screenshot
After capturing the screenshot, you can annotate the screenshot within the Gemoo Snap. To save the screenshot to your clipboard, copy and paste the screenshot. It will store the screenshot in your clipboard for further use.
Take a Screenshot in Picsart Mac
On your Mac, you may take screenshots and modify them, allowing you to easily share and save your visual works while showcasing your artistic sense. With this tool, you may inspire others, share your techniques, give back to the thriving digital art community, and assist with personal documentation. You can document and showcase your artistic accomplishments to the world with PicsArt on your Mac. Now, let’s explore the steps to take a screenshot in PicsArt on a Mac:
Step 1: Launch PicsArt on your Mac and navigate to the image or screen you want to capture.
Step 2: Position and resize the PicsArt window to frame the desired content within the screen.
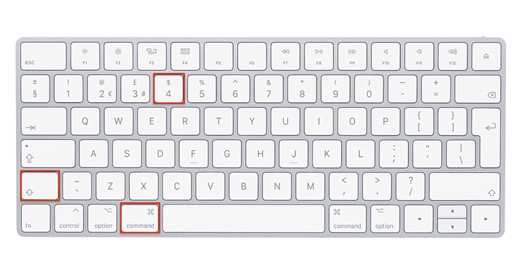
Step 3: Press the Command + Shift + 4 keys simultaneously on your Mac keyboard. This will activate the screenshot capture mode.
Take a Screenshot in Picsart Mac
Step 4: Your cursor will turn into a crosshair. Click and drag the crosshair to select the area you want to capture within the PicsArt window. Release it to capture the screenshot of the selected area.
Take a Screenshot in Picsart iPhone
With its user-friendly design and extensive feature set, PicsArt offers a seamless editing experience for both novice and experienced photographers. You could find yourself needing to take screenshots while altering images in PicsArt to save or share your artistic adjustments.
Taking a screenshot in PicsArt on an iPhone is a simple process that requires a few clicks. Taking screenshots in PicsArt lets you quickly record and save your visual projects, whether you want to chronicle a particular step in your editing process or capture the finished altered image. In the steps presented below, we’ll walk you through how to take screenshots in PicsArt on an iPhone.
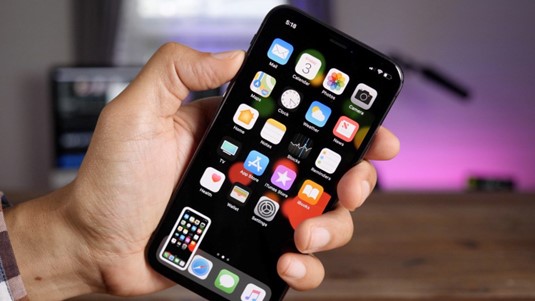
Step 1: Locate and open the PicsArt app on your iPhone’s home screen.
Step 2: To capture a screenshot on an iPhone, press and hold the Power and Volume Up buttons simultaneously. Release the buttons quickly after pressing them.
Take a Screenshot in Picsart iPhone
Step 3: After taking the screenshot, a thumbnail preview will appear in the bottom left corner of your screen. Tap on it.

Thumbnail Preview on iPhone
Step 4: Use the editing tools in the screenshot editor to make any desired adjustments or annotations. Click the “Done” button once finished.
Step 5: Choose whether you want to save the screenshot to your iPhone’s Photos app or share it with others through various platforms such as social media, email, or messaging apps.
Take a Screenshot in Picsart Android
PicsArt is a popular option for photography enthusiasts and social media users since it has various features, such as advanced editing tools, filters, and effects. Follow these steps to take a screenshot in PicsArt:
Step 1: Open the PicsArt app on your Android device and navigate to the screen or image you wish to capture.
Step 2: Press your device’s Power and Volume Down buttons simultaneously. Please be aware that depending on the model of your Android device, the button combination for taking screenshots may change.
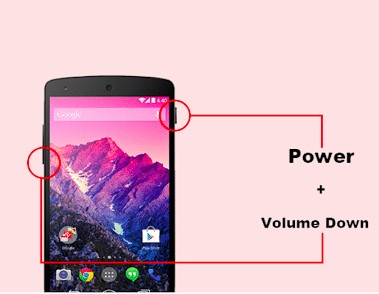
Take a Screenshot in Picsart Android
Step 3: The screenshot will successfully be taken when you see a flash animation or hear a camera shutter sound.
Step 4: It will be immediately saved in your device’s “Screenshots” or “Pictures” directory, usually where screenshots are saved by default.
Step 5: You may find the screenshot by opening the gallery app on your device or by using a file manager to find the folder where it is kept.
FAQs From Picsart Users
By the end of the post, we collect several frequently-asked questions from Picsart users.
How to save a picture from Picsart?
Complete the editing process and hit Done to confirm your adjustments in Picsart before saving the image. Select the “Save” button next. This will bring up a menu with different options for saving. Select the desired choice from the menu, such as saving the image to your device’s gallery or immediately sharing it on social media. The picture will be saved to the specified location.
Where does Picsart save pictures?
Picsart normally saves images on your device’s camera roll or gallery. Each image you save will have a Picsart or Picsart Studio folder automatically created by your device’s default gallery app. However, the specific position may vary based on your device and operating system.
Can I use images from Picsart?
Yes, you can use images from Picsart. Users can access a platform to modify and produce their own images. It also has a large library of freely downloadable pictures, stickers, backgrounds, and other artistic components. These tools may be used to improve personal images or create distinctive compositions.
Final Thoughts
This guide has provided a comprehensive overview of how to screenshot Picsart, enabling you to preserve and share your creative endeavors easily. You can confidently take screenshots of your preferred Picsart edits, collages, or designs by following the instructions above. We hope this guide has inspired you to unleash your creativity and take full advantage of Picsart’s capabilities. It’s now your time! Please share your experiences and any further advice in the comments box below.