In the rapidly evolving landscape of AI tools, OpenAI’s ChatGPT has emerged as a groundbreaking tool for human-like conversation. Initially limited by its dataset, which ended in late 2021, ChatGPT gained immense popularity due to its ability to generate coherent and contextually relevant responses. With the introduction of Plugins, the functionality of this generative AI chatbot has expanded significantly. Plugins serve as direct links to specific services, enabling ChatGPT to tap into the vast resources available on the internet. This newfound web access empowers ChatGPT to provide up-to-date information, perform real-time tasks, and access various online services, offering users a more comprehensive and dynamic conversational experience.
Adding plugins to ChatGPT involves integrating them into the existing architecture, allowing the chatbot to interact with external services seamlessly. Using plugins’ power, ChatGPT is catching up with its competitors and taking its conversational abilities to new heights. This guide will explore complete details about how to add plugins to ChatGPT. So, continue reading till the end!
Also read: How to Add Plugins to ChatGPT? >
Table of Contents: hide
What Is The Functionality of ChatGPT Plugins?
How to Subscribe to ChatGPT Plus?
How to Enable Plugins Option on ChatGPT?
How to Install Plugins from the Plugins Store on ChatGPT?
What are ChatGPT Plugins?
ChatGPT plugins enhance the capabilities of the ChatGPT language model by leveraging its ability to browse the internet and interact with various websites and applications. These plugins provide ChatGPT access to current knowledge, allowing it to learn more than it could have learned during its original training. ChatGPT plugins allow the model to deliver news updates and dynamic interactions by integrating with external sources. With the help of this feature, ChatGPT can respond to user inquiries more precisely and pertinently, keeping the conversation lively and informative. Thus, these plugins allow the model to go beyond its initial conception by utilizing other sources and enhancing the user experience.
What Is The Functionality of ChatGPT Plugins?
ChatGPT plugins offer several functionalities that expand the capabilities of the language model. They enable access to updated data, allowing ChatGPT to provide relevant information based on user queries. Furthermore, plugins facilitate integration with knowledge bases, offering users direct access to information for scenarios such as customer support or FAQs. Additionally, these plugins can be utilized to integrate with various services. These functionalities empower ChatGPT to exceed its core abilities and provide more dynamic and personalized interactions.
How to Subscribe to ChatGPT Plus?
ChatGPT Plus is a subscription plan that unlocks premium features and benefits for an enhanced AI-powered conversation experience. By subscribing to ChatGPT Plus, you can access exclusive benefits and enjoy an enhanced conversational experience. Check the steps below for this process:
Step 1: Access your account, go to the left menu, and click “Upgrade to Plus.”
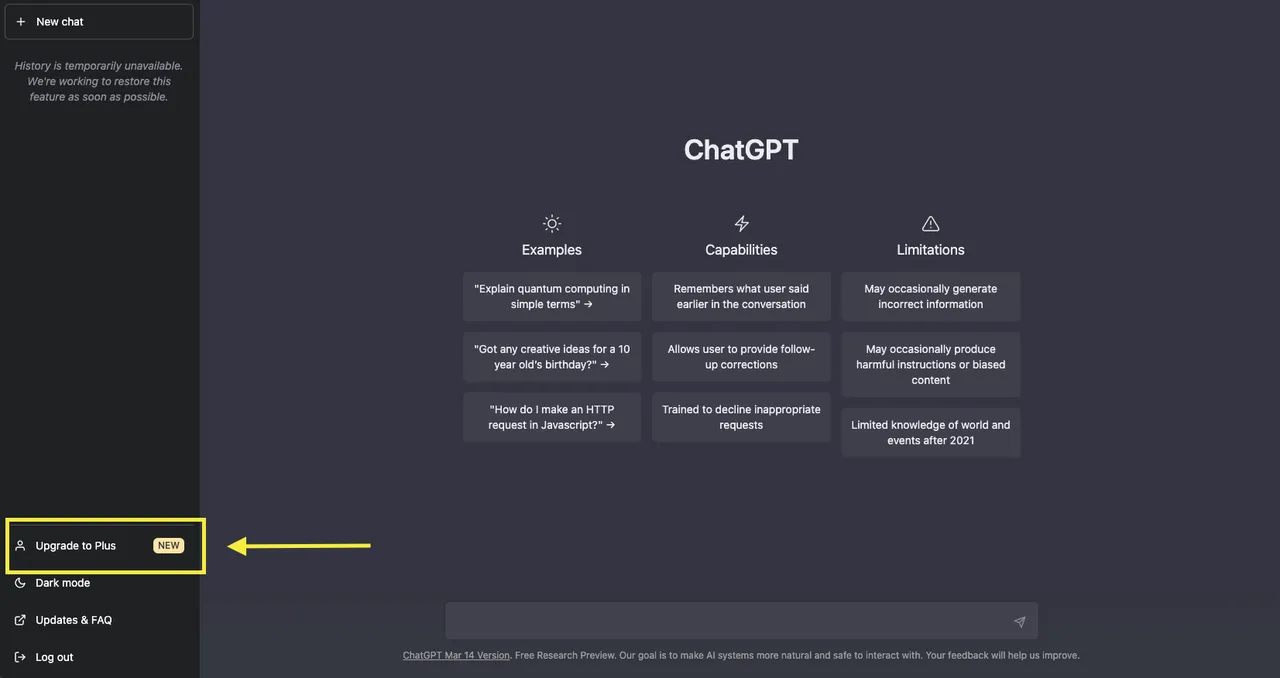
Upgrade to Plus
Step 2: Select the ChatGPT Plus upgrade plan.
Step 3: Provide your bank details and set up a monthly recurring payment of $20. Proceed to the ChatGPT Plus features and enjoy the enhanced experience.
How to Enable Plugins Option on ChatGPT?
Whether you want to add new features, integrate external tools, or enhance the capabilities of ChatGPT, enabling Plugins opens up a world of possibilities. To explore their wide range of possibilities, follow the steps below to enable this feature.
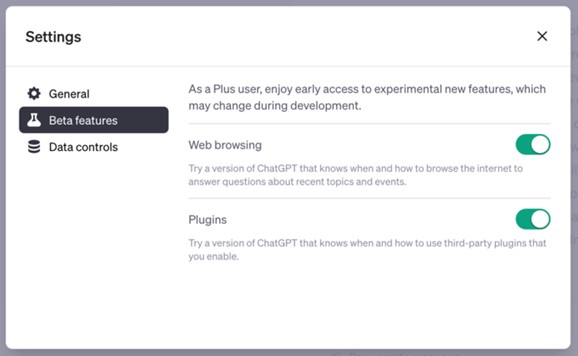
Step 1: Choose “Settings” from the menu.
Step 2: In Settings, choose “Beta features“.

Choose Beta Features
Step 3: Enable the plugin toggle button to enjoy the enhanced functionality and features.
How to Install Plugins from the Plugins Store on ChatGPT?
Enable Plugins
Installing plugins from a plugin store can allow ChatGPT to perform a wider range of tasks and provide more personalized responses. The plugin store offers a variety of plugins developed by the community; including language translation, image recognition, and data analysis tools, among others. Following these simple steps, users can easily install and activate plugins in ChatGPT.
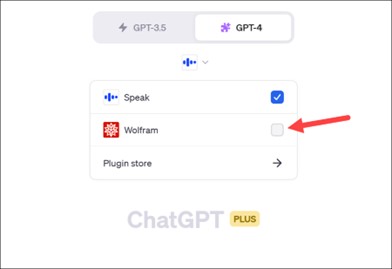
Step 1: Create a new chat and choose the GPT-4 option. Once selected, navigate to the plugins option, which will be visible in the interface.
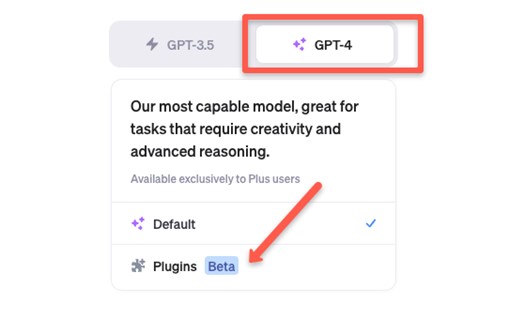
Navigate To Plugins Option
Step 2: Go to the menu and select “Plugins Store“.
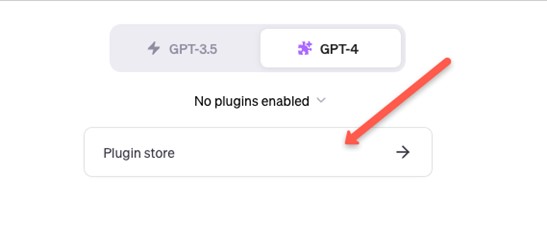
Select Plugin Store
Step 3: Browse the available plugins, select the ones you need, or use the search bar to find specific ones. Install desired plugins to add functionality.
How to Use and Manage Plugins on ChatGPT?
Currently, access to plugins is restricted to a limited group of users and developers as a security measure to prevent potential misuse. The company has implemented these limitations to ensure the responsible use of plugins. To use the plugins, you can, however, access the waiting list. You can express interest and manage these extra features once they are made accessible to a larger audience by signing up for the waiting list. Additionally, follow updates to learn when you can begin exploring and using the plugins in ChatGPT. Follow the steps below to join the waiting list:
Step 1: Open this URL Open AI Plungin Waitlist.
Step 2: Navigate to the Join Waitlist area by scrolling down the website. You will find a form.
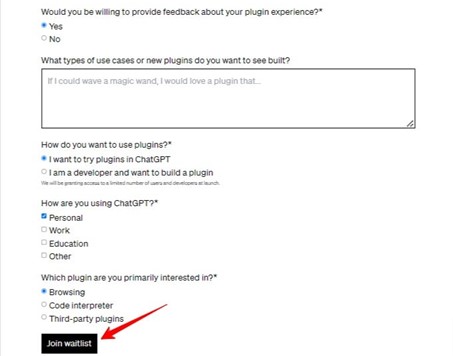
Click Join Waitlist
Step 3: Fill out the form with your details and select the reason for using plugins in ChatGPT. Join the waitlist to complete the signup.
How to Uninstall Plugins on ChatGPT?
ChatGPT Plugins are designed to enhance the capabilities of language models like ChatGPT, enabling them to perform previously impossible tasks. However, while the concept of ChatGPT Plugins is exciting, the reality may only sometimes live up to expectations. Users might want to delete a plugin due to the excess of third-party plugins. Follow these steps for this process:
Step 1: Click the New Chat button. Access the GPT-4 and use the ‘Plugins‘ option.
Step 2: Use the drop-down menu to explore the installed Plugins. Uncheck the Plugin to disable it temporarily.
Temporarily Disable a Plugin
Step 3: Go to ‘Plugin Store’ and open the ‘Installed’ tab.

Installed Tab
Step 4: Locate the desired Plugin and click ‘Uninstall’ next. The Plugin will be uninstalled successfully.
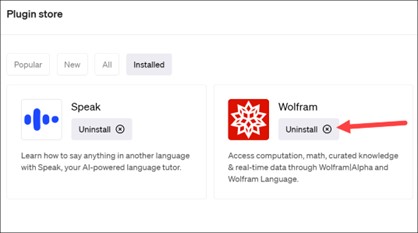
Permanently Uninstall a Plugin
Final Thought
In conclusion, you must now be familiar with all details about how to add plugins to ChatGPT. Users are buzzing with excitement over the news of plugins being introduced to ChatGPT. The possibilities that lie ahead have ignited a wave of anticipation among everyone. The upcoming update will bring exciting possibilities, allowing users to perform various tasks directly within the chat window, eliminating the need to switch to other platforms or interfaces. Must share your queries regarding ChatGPT Plugins in the comments below!
