In today’s digital age, capturing video has become easier than ever before. With the prevalence of smartphones and handheld devices, anyone can record high-quality footage on the go. However, one common issue among amateur videographers is camera shake. Shaky video can be distracting, and unprofessional, and can detract from the overall quality of your content. Fortunately, Apple’s iMovie is a user-friendly solution for stabilizing shaky video, and in this article, we’ll guide you through the process step by step.
Table of Contents: hide
How to Stabilize a Shaky Video in iMovie
iMovie is a powerful, yet intuitive video editing software that comes pre-installed on most Apple devices. If you don’t have iMovie on your Mac, you can easily download it from the Mac App Store. To stabilize your shaky video, follow these steps after installing iMovie. Now that you have an overview of iMovie let’s dive into each step in more detail.
Importing Clips
To import your shaky footage into iMovie, follow these steps:
- Open iMovie and create a new project by clicking “File” > “New Movie.”
- Click on the “Import Media” button in the media browser, or simply drag and drop your video file into the iMovie window.
- Select the clip you want to stabilize in the media browser and drag it down to the timeline at the bottom of the screen.
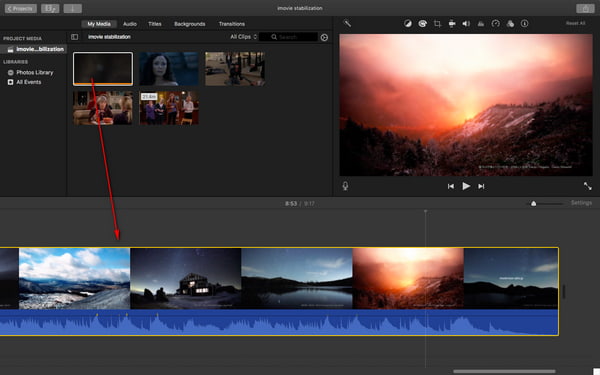
Drag the Video in Timeline
Choosing Stabilization Options
With your clip in the timeline, it’s time to apply stabilization:
- Select the clip in the timeline by clicking on it.
- Click on the “Stabilization” button in the toolbar above the viewer. iMovie will analyze the footage and apply its default stabilization settings.
- To adjust the amount of stabilization, go to the “Video” tab in the inspector panel on the right side of the screen.
- Drag the “Stabilization” slider to the left for less stabilization or to the right for more. As you adjust the slider, you’ll see the effect on your video in real-time.
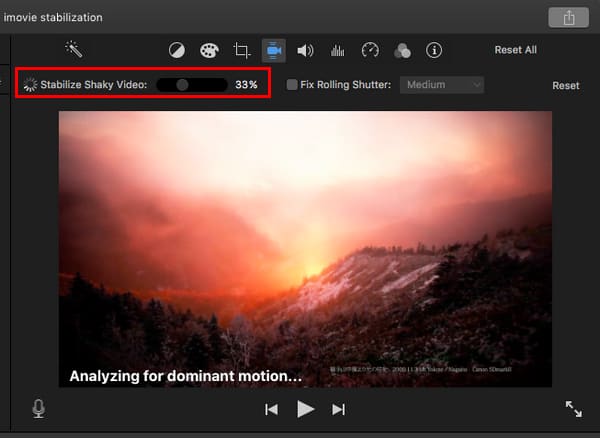
Choosing Stabilization Options
Adjusting Settings for Optimal Results
Depending on the nature of your footage, you may need to fine-tune the stabilization settings:
- If your video was recorded with a rolling shutter camera, such as an iPhone, check the “Reduce Rolling Shutter Distortion” box beneath the stabilization slider. This will help correct any distortion caused by the stabilization process.
- If you notice that the stabilized video appears zoomed in or cropped, try reducing the amount of stabilization applied using the slider in the inspector panel.
- Keep in mind that while iMovie’s stabilization feature is powerful, it may not be able to completely eliminate all camera shake, especially in extremely shaky footage.
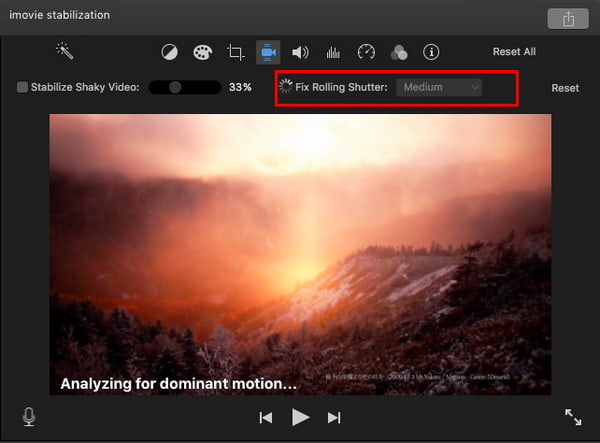
Fix Rolling Shutter
Warning About Stabilization Effects
While the stabilization feature of iMovie is a valuable tool for improving shaky video, it’s important to be aware of its limitations and potential drawbacks:
- Stabilization often involves cropping the edges of the frame to compensate for the camera movement. This means that your stabilized video may appear slightly zoomed in compared to the original footage.
- The zooming effect can lead to some loss of image quality, particularly in low-resolution videos. If your footage is already low-res, the stabilization process may result in noticeable pixelation or blurriness.
- In some cases, particularly with extremely shaky footage, the stabilization process may create an unnatural, “jello-like” effect where parts of the image appear to warp or distort.
Despite these potential issues, iMovie’s stabilization feature remains a powerful and user-friendly tool for improving the quality of your handheld video footage.
Conclusion
Stabilizing shaky video is an essential skill for any amateur or professional videographer, and iMovie makes the process incredibly simple and accessible. By following the steps outlined in this guide, you can transform your jittery, handheld footage into smooth, professional-looking video with just a few clicks. Once you’ve stabilized your video, you can use iMovie’s other features to enhance your footage further, such as adding titles, transitions, and music. If you need to convert your stabilized video to a different format, you can also use iMovie’s built-in sharing options or export your project for use in other video converters.