How to Stabilize Shaky Footage in After Effects

Shaky footage can be a major distraction in your videos, removing the professional quality you strive for. Whether you’re a YouTuber, filmmaker, or content creator, stabilizing your footage is crucial in post-production. Adobe After Effects, a powerful tool for video editing and motion graphics, offers several methods to help you achieve smooth, stable footage. In this article, we’ll explore three easy ways to stabilize your shaky videos using After Effects.
Table of Contents: hide
Method 1: Stabilize Videos in After Effects Warp Stabilizer
Method 2: Tracking and Stabilizing with Stabilize Motion Feature
Method 3: Stabilize Shaky Footage in After Effects with Third-Party Plugins
Stabilize Videos in After Effects Warp Stabilizer
The Warp Stabilizer is a built-in effect in After Effects that automatically stabilizes your video with just a few clicks. Here’s how to use it:
Step 1: Import your shaky footage into After Effects and create a new composition.
Step 2: Select the layer containing the shaky footage in the timeline.
Step 3: Go to the “Animation” panel and search for “Warp Stabilizer.”
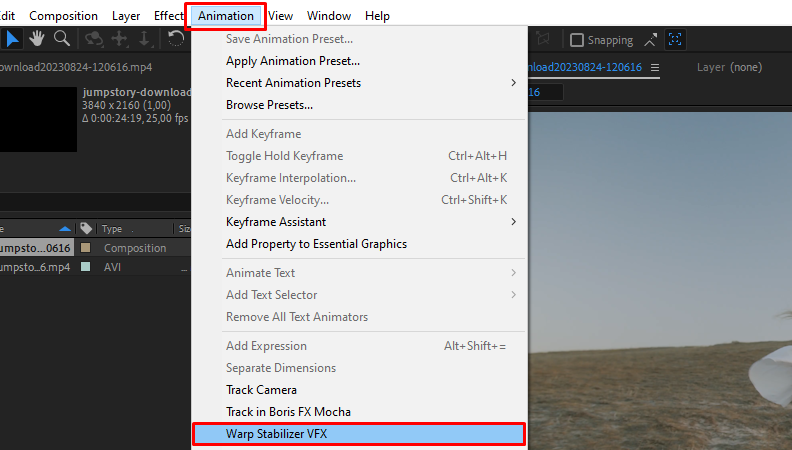
Apply Warp Stabilizer
Step 4: Double-click the effect to apply it to the selected layer.
Step 5: After Effects will analyze the footage and apply stabilization. This process may take a few moments, depending on the length and complexity of your clip.
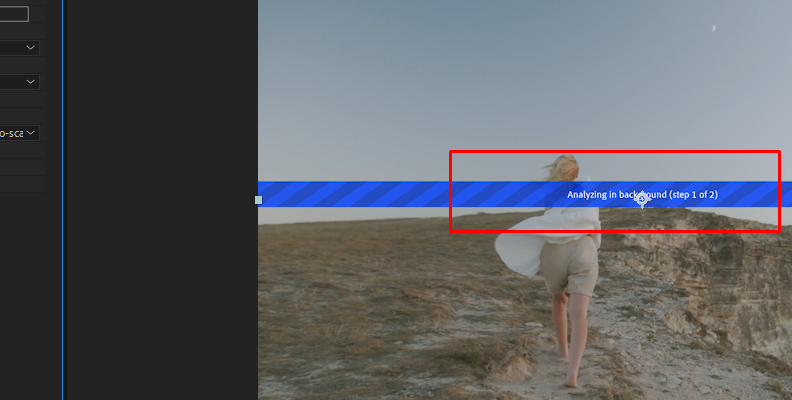
Analyze the Footage
Step 6: Once the analysis is complete, you can adjust the stabilization settings in the “Effect Controls” panel. The default settings often work well, but you can fine-tune the smoothness, crop, and other parameters to achieve the desired result.
The Warp Stabilizer is an excellent choice for most stabilization needs, as it automatically detects and corrects camera motion. However, in some cases, you may need more control over the stabilization process.
Tracking and Stabilizing with Stabilize Motion Feature
For more advanced stabilization, you can use After Effects tracking features along with null objects. This method allows you to select specific points in your footage to stabilize, giving you more control over the final result. Here’s how it works:
Step 1: Import your shaky footage into After Effects and create a new composition.
Step 2: Select the Stabilized Motion feature in the Tracker panel and the tracker box will appear in the Layers panel. You will then need to find the right point in the shot for the tracker to work properly.
Select the Stabilized Motion Feature
Step 3: Select the layer containing the shaky footage in the timeline.
Step 5: Go to the “Tracker” panel and choose “Track Motion.”
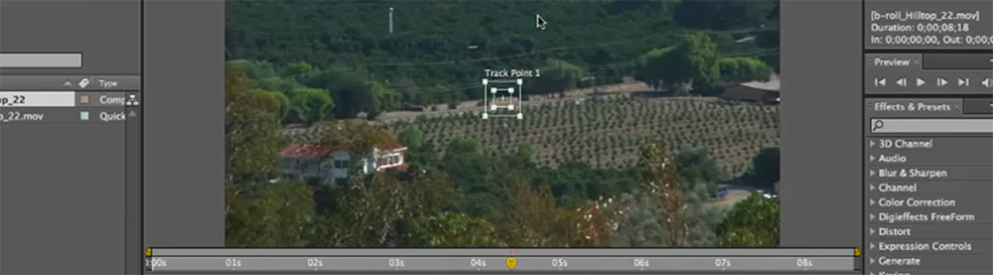
Step 7: In the composition viewer, place the tracker point on a stable, high-contrast area of your footage. This could be a distinct object or a specific point that remains visible throughout the clip.
Step 8: Click the “Play” button in the “Tracker” panel to track the selected point. After Effects will analyze the footage and create a motion path based on the tracked point.
Step 9: Once the tracking is complete, click “Edit Target” in the “Tracker” panel and select the null object you created earlier.
Step 10: Click “Apply” and choose “X and Y” to apply the tracking data to the null object.
Step 11: Select the shaky footage layer and press “P” to reveal the position property.
Step 12: Alt-click the stopwatch icon next to the position property to create an expression.
Step 13: Drag the pick whip (the spiral icon) from the position property to the null object in the composition viewer. This links the position of the footage to the null object, effectively stabilizing the video.
You can achieve more precise stabilization results by tracking specific points and applying the data to null objects.
Stabilize Shaky Footage in After Effects with Third-Party Plugins
In addition to the built-in tools, several third-party plugins are available for After Effects that can help you stabilize your footage. Some popular options include:
- CoreMelt Lock & Load X: This plugin offers advanced stabilization features, including the ability to track multiple points and adjust the smoothness of the stabilization.
- Imagineer Systems mocha AE: Mocha AE is a planar tracking plugin that tracks and stabilizes specific regions within your footage, making it ideal for shots with complex motion or parallax.
- Vision Effects RE:Flex: RE: Flex is a powerful stabilization plugin that uses optical flow technology to analyze and stabilize your footage, offering advanced control options for fine-tuning the results.
While these plugins can be more expensive than using the built-in tools, they often provide additional features and improved performance for challenging stabilization tasks.
Tips and Best Practices
To get the best results when stabilizing your footage in After Effects, consider these tips:
- Use stabilization equipment such as a tripod, gimbal, or other methods to minimize camera shake during shooting.
- Analyze your footage: Before applying stabilization, oversee your footage to identify the most stable areas or points to track.
- Work with high-quality footage: Higher resolution and less compressed footage will generally yield better stabilization results.
- Try different methods: Each stabilization method has its strengths and weaknesses. Try different techniques to find the best one for your specific footage.
- Adjust settings as needed: Be bold and fine-tune the stabilization settings to achieve the perfect balance between smoothness and the desired look of your video.
Conclusion
Stabilizing shaky footage is essential for any video editor or content creator. With Adobe After Effects, you can access a range of powerful tools and techniques to help you easily create professional-looking videos. Whether you use the built-in Warp Stabilizer, track and stabilize with null objects, or rely on third-party plugins, the key is to experiment and find the best method for your specific needs. By following the steps and keeping the best practices in mind, you’ll be well on your way to creating stunning, stable videos that captivate your audience.
Additional Resources
- Adobe After Effects User Guide: Tracking and Stabilizing Motion
- Video Tutorial: How to Stabilize Footage in After Effects
- After Effects Scripts and Plugins: aescripts + aeplugins
By mastering the art of footage stabilization in After Effects, you’ll take your video editing skills to the next level and create content that truly stands out in a crowded digital landscape.