Ultimate Guide: How to Crop Aspect Ratio in Final Cut Pro Like a Pro (2025)

Introduction to Aspect Ratios in Final Cut Pro
Final Cut Pro is a favorite among content creators, offering powerful video editing tools including aspect ratio adjustments. But if you’re new to it, the idea of cropping an aspect ratio might seem a bit tricky.
In simple terms, aspect ratio refers to the width and height of your video frame. Think of it as the shape of your screen. Some of the most popular aspect ratios include:
- 16:9 – Standard widescreen (used for YouTube, films, etc.)
- 1:1 – Square videos for platforms like Instagram
- 9:16 – Vertical format perfect for Stories, Reels, and TikTok
- 4:3 – Old-school TV and some digital screens
By learning how to crop aspect ratio in Final Cut Pro, you’ll have more control over how your videos look across different platforms and devices.
Why Changing the Aspect Ratio Matters
Not all videos are created equal—and not all platforms display them the same way. That’s why changing the aspect ratio is so important.
📱 Social Media Specifics:
- Instagram prefers 1:1 or 4:5
- TikTok and Reels love 9:16
- YouTube is happy with 16:9

If your content doesn’t fit the screen just right, you risk losing viewer attention, or worse, having your visuals cropped awkwardly by the platform.
Pro Tip: For creators juggling multiple platforms, tools like Gemoo, an AI auto-editing software, can automate aspect ratio adjustments and save hours of manual cropping.
Preparing Your Project in Final Cut Pro
Before you crop anything, start by organizing your project correctly.
- Import Your Media – Drag your video clips into the Final Cut Pro timeline.
- Create a New Project – Select File > New > Project.
- Choose Custom Settings – You can pick the frame size, resolution, and aspect ratio manually here.
Pro Tip: Make sure your timeline’s aspect ratio matches your final export goal.
Cropping vs. Changing Aspect Ratio: Key Differences
Let’s clear this up:
- Cropping removes parts of the image without changing the project settings.
- Changing Aspect Ratio alters the shape of the entire canvas.
You can crop within a set aspect ratio or change the canvas altogether depending on your needs.
Step-by-Step Guide: How to Crop Aspect Ratio in Final Cut Pro
Follow these steps to get the perfect crop:
1.Open Your Project – Make sure your desired clip is selected in the timeline.
2.Use the Inspector Panel – Open the Inspector (Command+4) and scroll down to the Transform section.
3.Apply Crop – Click on the Crop Tool (found in the viewer or via the inspector).
- Choose Crop to Fill for automatic aspect adjustments.
- Drag the frame to crop manually if needed.
4.Adjust Aspect Ratio for Export – Go to File > Share > Master File (default).
- Under Settings, choose the desired resolution and aspect ratio.
Done! You’ve successfully cropped your aspect ratio in Final Cut Pro.
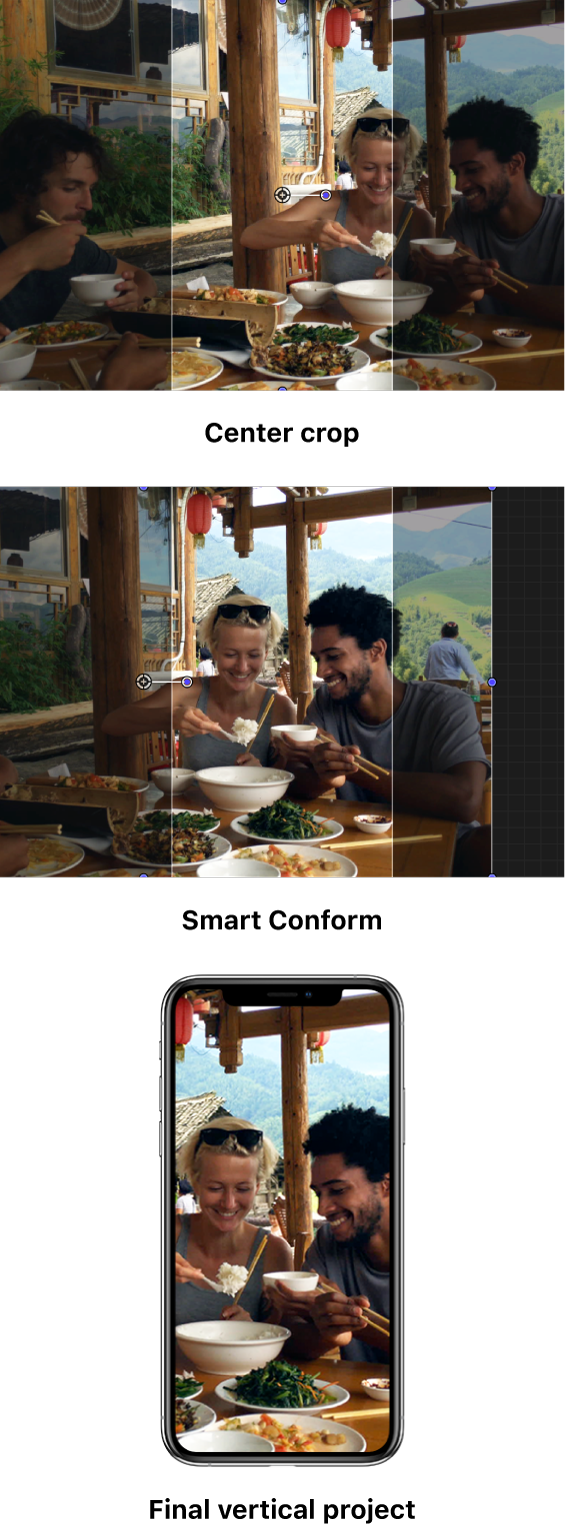
Using Smart Conform Feature in Final Cut Pro
If you want to crop your video to a different aspect ratio without manually adjusting every frame, Smart Conform is your best friend. It’s an AI-powered tool that analyzes your footage and automatically reframes it to fit the selected format—especially helpful for vertical formats like 9:16.
How to Use Smart Conform:
- Select the clip in the timeline.
- Go to Modify > Smart Conform.
- Final Cut Pro will process and reposition the subject within the new aspect ratio.
Pro Tip: If you need even faster AI-driven cropping for social media, check out Gemoo. Its auto-reframing feature handles aspect ratio adjustments in seconds, perfect for batch processing TikTok or Reels content.
Custom Aspect Ratios: Manual Settings
Sometimes, your project demands a very specific frame size—perhaps for a brand campaign or cinematic short film.
Here’s how to do it manually:
- When creating a new project, click “Use Custom Settings.”
- Set your resolution (like 1080 x 1350 for Instagram Portrait).
- You can also crop in the Transform section later for additional tweaks.
Creating templates for frequently used aspect ratios can save tons of time in future projects.
Cropping to Fit Social Media Platforms
Let’s break down the ideal crops for each platform:
| Platform | Recommended Aspect Ratio | Dimensions |
|---|---|---|
| Instagram Feed | 1:1 | 1080×1080 |
| Instagram Stories/Reels | 9:16 | 1080×1920 |
| YouTube | 16:9 | 1920×1080 |
| Facebook Video | 4:5 | 1080×1350 |
| TikTok | 9:16 | 1080×1920 |
Always preview your export before uploading to ensure it looks exactly how you want.
Troubleshooting Common Cropping Issues
Even with the right tools, you might encounter a few hiccups when cropping aspect ratios in Final Cut Pro. Let’s walk through some common issues and how to solve them.
🧱 Black Bars on Export
These black bars (letterboxing or pillarboxing) typically appear when your project aspect ratio doesn’t match the export settings.
Fix:
- Double-check your project settings.
- Ensure the export resolution matches your intended aspect ratio.
- Use “Scale to Fill” or Smart Conform to avoid unused frame space.
📉 Loss of Quality After Cropping
Cropping too tightly can lead to pixelation or poor video quality.
Fix:
- Try not to upscale too much after cropping.
- Use original high-resolution clips.
- Export at a higher bitrate when necessary.
Tips for Professional Cropping and Composition
Want your crops to look sleek and cinematic? Use these pro tips:
🎯 Follow the Rule of Thirds
Position your subject using grid lines to enhance visual appeal. Most editing software, including Final Cut Pro, offers a grid overlay for easier composition.
📌 Keep the Focus Centered (for Social Media)
Platforms like TikTok and Instagram prioritize center-focused content. Make sure important visuals aren’t pushed to the edges.
💡 Mind Headroom and Framing
Avoid cutting off heads or leaving too much space above the subject. Keep the composition tight but balanced.
Third-Party Plugins for Better Cropping
If you want to streamline your workflow even more, consider third-party plugins.
🔌 Top Plugins for Cropping and Reframing:
- MotionVFX mReframe – Offers quick aspect ratio conversions.
- Pixel Film Studios AutoReframe – Automatically adjusts compositions.
- CoreMelt SliceX – Great for advanced cropping and masks.

Pro Tip: For AI-powered cropping that requires zero manual input, try Gemoo. It’s designed to handle aspect ratio adjustments, auto-zooms, and reframing with just a few clicks—ideal for creators who need quick, polished results.
How to Maintain Resolution While Cropping
When you crop in Final Cut Pro, you’re technically zooming in. This can reduce your video’s clarity if you’re not careful.
🧠 Best Practices:
- Start with 4K footage even if you’re exporting in 1080p.
- Use minimal zoom whenever possible.
- Always export at high quality (use ProRes if needed).
Cropping Multiple Clips at Once
Cropping clips individually is time-consuming. Here’s how to crop in bulk:
🛠️ Method 1: Use Adjustment Layers
Apply an adjustment layer over multiple clips and crop it. All clips below the layer will inherit the crop.
🛠️ Method 2: Copy & Paste Attributes
Crop one clip, then use Edit > Copy, select other clips, and go to Edit > Paste Attributes, choosing the Crop option.
Pro Tip: If you’re editing for multiple platforms, tools like Gemoo can batch-process clips into different aspect ratios simultaneously, saving you from repetitive manual work.
Final Export: Best Practices
You’re done editing—now let’s export the right way.
✅ Steps for High-Quality Export:
1.Go to File > Share > Master File.
2.In the Settings Tab, select:
- Format: Video and Audio
- Codec: H.264 or ProRes
- Resolution: Match your project’s crop ratio
3.Hit Next and Save your final output.
Always preview the video before uploading it anywhere to catch any framing issues.
Conclusion: Mastering Aspect Ratios in Final Cut Pro
Understanding how to crop aspect ratio in Final Cut Pro gives you creative control over your video content, whether you’re producing YouTube videos, Instagram Reels, or cinematic short films. With tools like Smart Conform, crop-to-fill, and adjustment layers—or time-saving AI solutions like Gemoo—you can achieve professional results without breaking a sweat.
Don’t forget: proper aspect ratios mean better engagement, cleaner visuals, and more polished storytelling. So go ahead—crop like a pro!
FAQs
1.Can I change the aspect ratio mid-project in Final Cut Pro?
No, the aspect ratio is tied to your project settings. You’ll need to create a new project with a different ratio and re-import your clips.
2.What’s the easiest way to crop for Instagram Reels?
Use Smart Conform or crop manually to 1080×1920 in a vertical project timeline. Tools like Gemoo automate this process for Reels-ready exports.
3.Will cropping affect video quality?
Yes, if you zoom in too much. Use high-res footage and avoid excessive scaling.
4.How can I crop several clips the same way?
Use Paste Attributes or an adjustment layer with consistent crop settings.
5.Is there a free plugin for aspect ratio cropping?
Yes, tools like MotionVFX Free Templates or custom motion files can help.
6.Can I undo cropping without losing the original framing?
Absolutely. Just reset the crop settings in the Inspector panel.