Adding captions to your YouTube videos is a fantastic way to make your contBest Practices for Captionsent accessible to a broader audience. Captions not only help those who are deaf or hard of hearing but also cater to viewers who prefer watching videos without sound. Plus, they can improve engagement and retention. Let’s dive into how you can easily add captions to your YouTube videos!
How to Add Captions to YouTube Videos?
7 Easy Steps to Add Captions to Your YouTube Videos
Step1: Uploading Your Video
First things first! Ensure your video is uploaded to your YouTube channel. If you haven’t done that yet, log in to your account, click on the camera icon in the top right corner, and select “Upload Video.”

Upload Video
Step2: Access YouTube Studio
Once your video is uploaded, navigate to YouTube Studio. You can find it by clicking on your profile icon in the top right corner and selecting “YouTube Studio” from the dropdown menu.

YouTube Studio
Step3: Select Your Video
In YouTube Studio, click on “Content” in the left sidebar to see all your uploaded videos. Find the video you want to add captions to and click on the thumbnail or title to open the video details.

click on “Content”
Step4: Go to the Details
In the video details page, look for the “Subtitles” tab on the left side. Click on it to access the captioning options for your video.
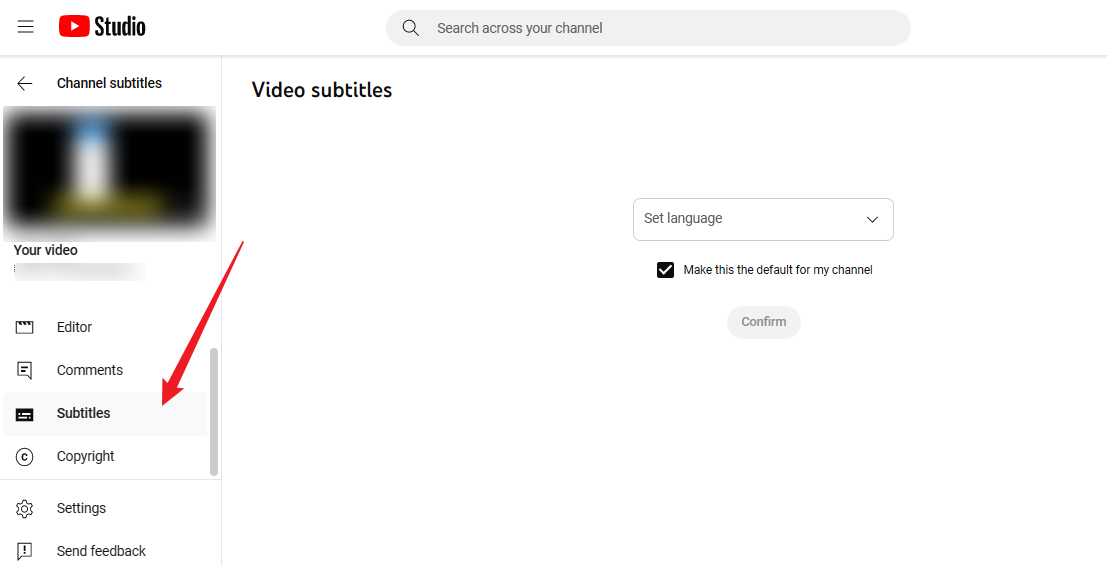
Subtitles tab
- Note: On the video details page, if the gray “Subtitles” box on the right is not selectable, you need to select the video language before adding subtitles. Go back to the Details page, click “Show more,” and scroll down to “Language and captions certification” to select the video language.

video language

Video details
Step5: Add New Subtitles or Captions
After setting the language, click on “Add” next to the desired language in the “Subtitles” section. Here, you have a couple of options:
- Upload file: If you have a subtitle file ready (like .srt or .lrc) , you can upload it directly.
- Auto-sync: You can create subtitles and captions by putting them in as you watch the video. You must set the timing to sync with your video with this option.
- Type manually: Create subtitles and closed captions by typing them in as you

Add New Subtitles or Captions
- Upload file: If you have a subtitle file ready (like .srt or .lrc) , you can upload it directly.
- Auto-sync: You can create subtitles and captions by putting them in as you watch the video. You must set the timing to sync with your video with this option.
- Type manually: Create subtitles and closed captions by typing them in as you watch the video.
Step6: Edit and Sync Captions
If you’re typing or editing automatic captions, you can adjust the text to ensure it’s accurate and synced properly with your video. Use the timeline feature to set the timing for each caption segment. Make sure they are displayed long enough for viewers to read comfortably.
Step7: Save Changes
Once you’ve added and edited your captions, don’t forget to hit the “Publish” button to save your changes. Your captions will now be available for viewers to toggle on or off while watching your video.
Best Practices for Captions
- Keep It Short: Try to keep each caption line to a maximum of two lines and aim for around 32 characters per line. This helps with readability.
- Use Proper Formatting: Avoid excessive punctuation and use sentence case for a more professional appearance.
- Include Speaker Identification: If there are multiple speakers, consider including their names for clarity, especially in dialogues.
- Review for Accuracy: Always double-check for typos or errors in spelling and grammar.
Final Thoughts
Adding captions to your YouTube videos is a simple yet powerful way to enhance accessibility and engagement. By following these steps, you’ll be able to make your content more inclusive, allowing everyone to enjoy your videos fully. So, take the time to add those captions and watch your audience grow!

The Gemoo Team Let everyone enjoy a simplified workflow of video creating, editing, and sharing.


